Network Traffic Monitoring using OpenFlow

These days you don’t have to shell out thousands of pounds for an OpenFlow switch. Especially if you don’t mind lesser number of ports and devices that are not blazingly fast. I purchased a Zodiac FX OpenFlow switch and have been trying out different projects with it. The switch has 4 ports at 100M each with Port 4 reserved for management.

Figure 1: Network Setup for Traffic Snooper

To make a Traffic Snooper we need to mirror ports that allow ingress into and egress from the internal network. Port mirroring means sending same traffic to the target port as well as a mirror port. We may also filter traffic that is mirrored (e.g. we may only want to mirror Layer 4: UDP traffic). 

For the Zodiac FX, I selected Port 2 to be the mirror port. Traffic exiting the internal network will arrive on Port 1 and be sent out from Port 2 and Port 3 (Apply Action List). Similarly traffic entering the internal network from the Internet will arrive on Port 3 and be sent out from Port 2 and Port 1.

Thus Port 2 will receive packets from both the directions. Port 2 is attached directly to a Raspberry Pi with Link Local addressing enabled. This means that the port on the Raspberry Pi has a link local IP address assigned to it. We don’t really care about this because we are already forcing the traffic to come this way using a static flow. 

On the Traffic Snooper Pi I run my Python based Traffic collector. This utilises raw sockets to listen for traffic. All data is converted into hex and dumped into the Analytics Store database (Mongo DB). This is a fairly simple utility perfect for a lightweight platform like the Pi. It does not do any processing of the network data. It simply stores it in a database. The source code is attached for both the Snooper and the static controller which uses Ryu.

Snooper.py: https://docs.google.com/document/d/e/2PACX-1vTVV-G17M-TrLfGd2gt0B-5aK_NshjZ1-F1tWvrQwbTHR4Z-FYoaAzfOYdMVtGxP3B1ODLoWWiQiWS3/pub

The Traffic Snooper needs the following to read from the raw socket that is getting data from port 2 of the switch (the mirrored port):

s = socket.socket(socket.AF_PACKET, socket.SOCK_RAW, socket.htons(3))

The line above can be interpreted as:

Open a socket that uses Address Family (AF) of Packets (you will need to run snooper with sudo to provide access) that will allow access to Layer 2 information. The socket is a raw type – therefore Layer 2 headers will not be stripped. Finally we provide the host to network byte order conversion (htons). 

This gives us a socket that pulls the packet with all the information (headers) intact and also ensures the byte ordering is correct.

The Traffic Snooper also stores the packet hash to ensure we do not store duplicate packets (this can be disabled if required).

Note: port 2 will not get any direct assignment of IP address (we don’t want any traffic to use this port for communication – only mirrored traffic should use this port) and should default to a ‘link-local’ IP address. In case of IPv4, link-local addresses are defined in the address block 169.254.0.0/16

Static_Controller.py: https://docs.google.com/document/d/e/2PACX-1vRU8ZAa5Vl03UwC5K61Rt9Me0y0tvKq_0s8lCm7aH9t7vN_Z6qnUMQgINPFdCrt9BM-kBkJh3uuJCyw/pub

The installed flows:

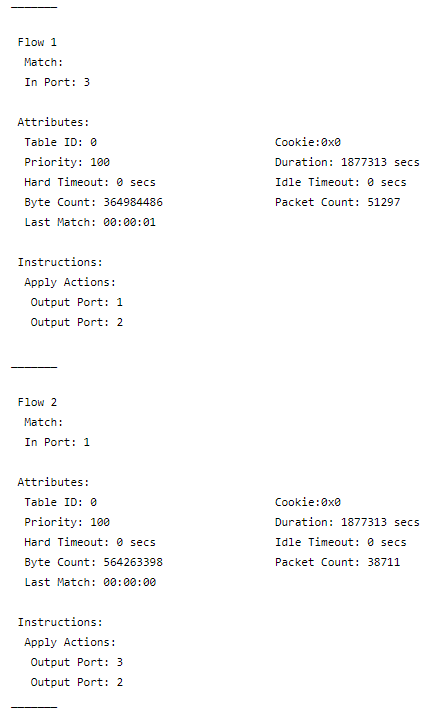
The OpenFlow Specification allows multiple Apply Actions. We use this to create duplicated traffic flows.
Flow 1: All traffic coming in from port 3 is forwarded to port 2 and 1. Here port 2 is the port connected to the analyser.

Flow 2: All traffic coming in from port 1 is forwarded to port 2 and 3.

Note: The controller is a static controller. In other words we use Ryu to install flows and then the controller is disconnected (thus flow timeout=0). To achieve this we use the ‘safe’ mode on the Zodiac FX which does not remove the flows that have been installed. As the Zodiac FX is a pure OpenFlow switch it does not support standalone mode.

Next Step: Next post will look at the traffic analyser that breaks down the incoming packet and pulls out various protocol related information.

Follow-up: I have used Zodiac FX for this post and not something like OpenVSwitch (which has several advanced features such as port mirroring and built in learning switch in ‘standalone’ mode) because I wanted to use a pure OpenFlow device that does nothing till you don’t provide the flows. 

OVS Implementation

It is fairly straight forward if you want to setup your Pi as a OVS switch. You will need USB-Ethernet plugs and a freshly formatted Pi. I used the lightweight no-desktop ‘Stretch’.

This is a good guide to follow: 
https://www.telematika.org/post/piovs-raspberry-pi-open-vswitch/

I only needed the ‘Install OVS’ and ‘Configure Interfaces’ step.

Below are the three interfaces I created, ‘eth2’ is the interface to the snooper and ‘eth3’ the ‘internet’ interface.

auto eth1
iface eth1 inet manual
hwaddress ether 00:0e:c6:de:54:15
auto eth2
iface eth2 inet manual
hwaddress ether 00:0e:c6:df:ae:ac
auto eth3
iface eth3 inet manual
hwaddress ether 00:0e:c6:df:ae:c2
auto ovsbr0
allow-ovs ovsbr0
iface ovsbr0 inet manual
ovs_type OVSBridge

There are few things to watch out for:

  1. The interface on the Raspberry Pi running the snooper application  should not be reachable from the network. This is because we do not want any traffic headed for that port. We only want to record traffic flowing between 1 and 3. Therefore, the Pi connected to port 2 of the switch should have two interfaces. One that has a valid local network address – to allow snooper to access the database server for example. The second which is connected to the switch interface 2 which receives the copied traffic. This second interface should have a link local IP address to ensure all the traffic received there either for port 1 or 3.
  2. Set the fail mode to ‘secure’ in OVS. If you do not set the fail mode in OVS to ‘secure’ then it will fall back to learning switch mode (standalone mode) and start faithfully switching traffic. This will mean (in short) your snooper Pi will have an IP address assigned to the port that is sniffing the mirrored traffic. Once you install the flows then the traffic will be mirrored but you can still get extra packets not part of the flow that we are monitoring.
  3. Use ‘sudo ovs-vsctl get-fail-mode <bridge_name>‘ to get the fail mode and then ‘sudo ovs-vsctl set-fail-mode <bridge_name> secure‘ to set to secure mode (replace bridge_name with the name of your OVS bridge). This will disable the learning switch and you will need to use the static-controller to setup the snooper flows.
  4. You can use ‘sudo ovs-appctl fdb/show <bridge_name>‘ to show the forwarding db (this stores the result of the mac learning) and ‘sudo ovs-appctl fdb/flush <bridge_name>‘ to clear the forwarding db.

A Question of Shared State

This post is about one of my favourite topics in Computer Science: shared state and the challenges related to concurrency.  Mature programming languages have constructs that allow us to manage concurrent access to state. Functional programming style is all about keeping ‘state’ out of the ‘code’ to avoid bugs when providing concurrent access. Databases also use different tricks to side-step this issue such as transactions and versioning.

Let us first define ‘shared state’: in general: any value that is accessible, for reading and/or writing, by one or more entities (processes, threads, humans) using a handle (variable name, URL, memory address). For example:

  1. in a database, the value associated against a key or a cell in a table
  2. in a program it is a value stored at a memory address 

Conceptual Model

Figure 1: Conceptual Model

The conceptual model is shown in Figure 1. Time flows from left to right and the State changes as Entities write to it (E1 and E2).

Entities (E1 and E3) read the State some time later.

Few things to note:

  1. State existed (with some value ‘1’) before E1 changed it
  2. E1 and E2 are sequentially writing the State
  3. E1 and E3 (some time later) are concurrently reading the State

Now that we understand the basic building blocks of this model as Entities, State(s) and the Operations of reading and writing of State(s), let us look at where things can go wrong.

Concurrent Access Problems

The most common problem with uncontrolled concurrent access is that of Non-deterministic behaviour. When two processes are writing and reading the same State at the same time then there is no way to guarantee the results of the read. Imagine writing a test that checks the result of the read in such a situation. It could be that the test passes on a slower system as the read thread has to wait (so the write has finished). Or it could be that the test passes on a faster system because the write happens quickly (and the read gets the right value). Worse yet: test passes but the associated feature does not work in production or works sporadically.

For problems like the above to occur in a concurrent access scenario all  three factors, given below, must be present:

  1. State is shared between Entities (which can be multiple threads of the same process)
  2. State once created can be modified (mutability) – even if by a sub-set of the Entities that have ‘write’ access to the State
  3. Unrestricted Concurrent Read and Write Operations are allowed on the State Store

All we need to do, to avoid problems when enabling concurrent access, is to block any one of the three factors given above.  If we do that then some form of parallel access will be available and it will be safe.

Blocking each can open the system up to other issues (there is no such thing as a free lunch!). One thing to keep in mind is that we are talking about a single shared copy of the State here. We are not discussing replicated shared States here. Let us look at what happens when we block each of the factors.

Preventing Shared Access

Here we are assuming shared access is a desired feature. This is equivalent of blocking option 1 (no shared state). This can be seen in Figure 2 (left) where two entities (E1 and E2) have access to different State stores and can do whatever they want with them because they are not shared. E1 creates a State Store with value ‘1’ and E2 creates another State Store with value ‘A’. One thing to understand here is that the ownership of the State Store may be ‘transferred’ but not ‘shared’. In Figure 2 (right) the State Store is used by Entity E1 and then ownership is transferred to E2. Here E1 is not able to use State Store once it has been transferred to E2. 

This is used in the Rust programming language. Once a State Store (i.e. variable) has been transferred out, it can no longer be accessed from the previous owning Entity (function) unless the new owner returns the State Store. This is good because we don’t know what the new function will do with the variables (e.g. library functions). What if it spins up a new thread? If the new owner Entity does not return or transfer further the State Store, the memory being utilised for the store can be re-claimed. If this sounds like a bad idea don’t worry! Rust has another mechanism called ‘borrowing’ which we will discuss towards the end of this post.

Previous section described interactions between functions. What about between threads? Rust allows closure based sharing of state between threads. In this context the ‘move’ keyword is used to transfer ownership of state to the closure. In Go channels use the same concept to clone state before sharing it.

Figure 2: No shared state (left) and borrowing of state (right

This solution makes parallel computation difficult (e.g. we need to duplicate the State Store to make it local for every Entity). The results may then need to be collated for further processing. We can improve this by using the concept of transfer but then that leads to its own sets of issues (e.g. ensure short transfer chains). 

Preventing Mutability

This option is an important part of the ‘functional’ style of programming. Most functional languages make creating immutable structures easier than creating mutable ones (e.g. special keywords have to be used, libraries imported). Even in Object Oriented languages mutable State Stores are discouraged. For example in Java the best practice is to make objects immutable and whole range of immutable structures are provided. In certain databases, when state has to change – a new object with the changed state is created with some sort of version identifier. Older versions may or may not be available to the reader.


Figure 3: Immutable State

Figure 3 shows this concept in action. Entity E1 creates State Store with value ‘1’. Later on, E2 reads the State and creates a new State Store with value ‘2’ (may be based on value of the previous State Store). If at that point there is no need to hold State Store with value ‘1’ it may be reclaimed or marked for deletion. 

Following on from this – the State Store with value ‘2’ is read by two Entities (E3 and E4) and they in-turn produce new State Stores with values ‘3’ and ‘4’ respectively. The important thing here is to realise that once State Store with value ‘2’ was created it cannot be modified, therefore it can be read concurrently as many times as required without any issues.

Where this does get interesting is if the two divergent state transitions (from value ‘2’ -> ‘3’ and ‘2’ -> ‘4’) have to be reconciled. Here too the issue is of reconciliation logic than concurrent access because State Stores with value ‘3’ and ‘4’ are themselves immutable.

One problem with this solution is that if we are not careful about reclaiming resources used by old State Stores we can quickly run out of resources for new instances. Creating of a new State Store also involves a certain overhead where existing State Store must be first cloned. Java, for example, offers multiple utility methods that help create immutable State Stores from mutable ones.

Restricting Concurrent Read and Write Operations

Trouble arises when we mix concurrent reads AND writes. If we are always ever reading then there are no issues (see previous section). What if there was a way of synchronising access to the State Store between different Entities?

Figure 4: Preventing Concurrent Read and Write Operations

Figure 4 shows such a synchronisation mechanism that uses explicit locks. An Entity can access the State Store only when it holds the lock on the State Store. In Figure 4 we can see E1 acquires the lock and changes value of State Store from ‘1’ to ‘2’. At the same time E2 wants to access the State Store but is blocked till E1 finishes. As soon as E1 finishes E2 acquires the lock and changes the value from ‘2’ to ‘3’.

Some time later E2 starts to change the value from ‘3’ to ‘4’, while that is happening E1 reads the value. Without synchronised access it would be difficult to guarantee what value E1 reads back. The value would depend on whether E2 has finished updating the value or not. If we use locks to synchronise, E1 will not be able to read till E2 finishes updating. 

Using synchronisation mechanisms can lead to some very interesting bugs such as ‘deadlocks’ where under certain conditions (called Coffman conditions) Entities are never able to acquire locks on resources they need and are therefore deadlocked forever. Most often these bugs are very difficult to reproduce as they depend on various factors such as speed of processing, size of processing task, load on the system etc.

Concepts used in Rust

Since I have briefly mentioned Rust, it would be interesting to see how the solutions presented have been used in Rust to ensure strict scope checking of variables. Compile time checks ensure that the issues mentioned cannot arise.

  1. Transfer of State: Rust models two main types of transfer – a hard transfer of the ownership and softer ‘borrowing’ of reference. If a reference is borrowed then the original State Store can still be used by the original owning Entity as now transfer of ownership has taken place.
  2. Restrictions on Borrowing: Since references can be both mutable and immutable (default type), we can quickly get into trouble with mutable references given alongside immutable ones. To prevent this from happening there is a strict rule about what types of references can exist together. The rule says that we can have as many immutable references at the same time OR a single mutable reference. Therefore, they change the protection mechanism depending on type of operations required on the State Store. For read and write – State Store is not shared (single mutable reference). For parallel reads – State Store cannot be changed. This allows them to be on the right side of the trade-off.
  3. Move: This allows state transfer between threads. We need to be sure that any closure based state transfer is also safe. It uses the same concept as shown in Figure 2 except the ownership is transferred to the closure and is no longer accessible from the original thread.

Go Channels

Go Channels provide state cloning and sharing out of the box. When you create a channel of a struct and send an instance of that struct over it then a copy is created and sent over the channel. Any changes made in the sender or receiver are made on different instances of the struct. 

One way to mess this up nicely is to use a channel of pointer type. Then you are passing the reference which means you are sharing state (and creating a bug for yourself to debug at a later date)..

Conclusion

We have investigated a simple model to understand how shared state works. Next step would be to investigate how things change when we add replication to the shared state so that we can scale horizontally.