In my previous post I walked through the major components of an Agentic Application beyond the Agent itself.
I had shared four important parts of such an app:
- Agent Runner and API to allow Agents to be accessed externally.
- Agent Execution and Session State Management that allows Agents to remember context and share state with each other (so called Short Term Memory).
- Long Term Memory that allows Agents to learn facts between sessions.
- Logging Telemetry to allow Agents to be monitored.
In this post I will cover points 1, 2 and 4. Point 3 I feel is needed only in specific use-cases and current tooling for Long Term Memory is evolving rapidly.
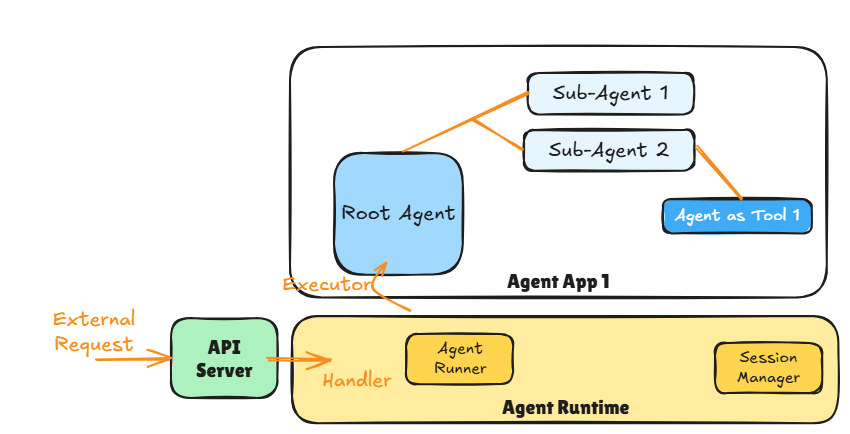
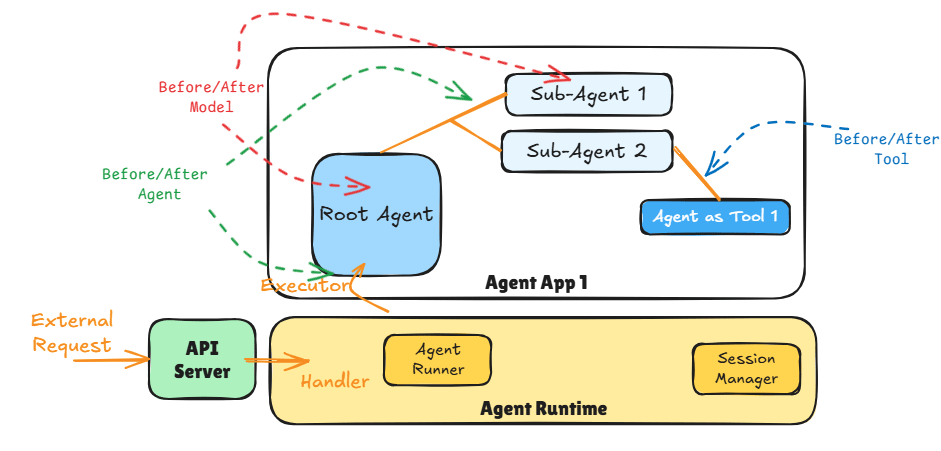
The diagram above shows the major components of an Agentic Application. The API Server is responsible for providing an endpoint (e.g., https REST, message queue) that external applications (e.g., chat client) can use to access the Agent App 1.
The API Server then invokes the appropriate handler method when the API is invoked. The handler method is responsible for triggering the Agent Runner in the Agent Runtime that deals with the execution of the Agent App 1.
The Agent Runtime is the component that:
1. Sets up the correct session context (e.g., current session history if the conversation thread is resuming) using the Session Manager
2. Manages the Agent Runner which executes the Agent App 1 by triggering its Root Agent.
Remember as per ADK one Agentic Application can only have one Root Agent per deployment.
The Agent Runner is then responsible for finishing the agentic app execution (including handling any errors). Agent Runtime then cleans up after the Agent Runner and returns any response generated by the Agent App 1 back to the handler where it can be returned to the caller using API constructs.
Key Concept: If the Agentic App does not have a sequential workflow and instead depends on LLMs or contains loops then the app keeps going till it emits a result (or an error).
This makes it difficult to set meaningful time-outs for request-response style and we should look at async APIs (e.g., message based) instead.
API Server
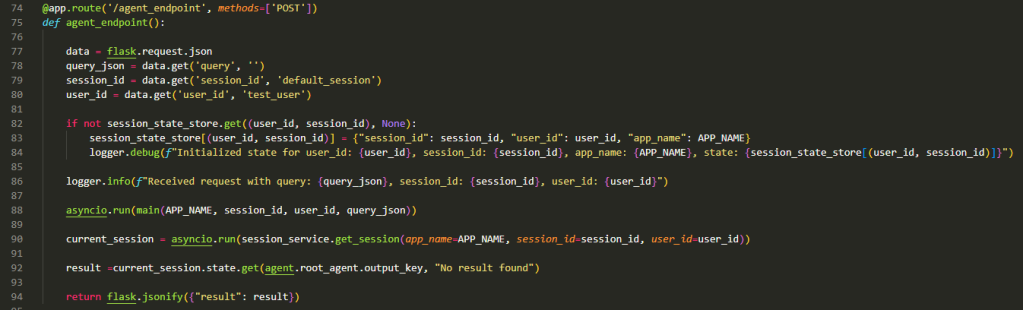
The code above shows the API handler function using Flask server.
Lines 77 – 80 are all about extracting data from the incoming request to deal with User, Session management and the Query integration (e.g., incoming text from the user for a chat app). Here we assume the requesting application manages the User Id (e.g., a chat app that handles the user authentication and authorisation) and Session Id.
Lines 82-84 are all about setting up the session store if no existing session context is found. This will usually trigger when the user say first engages with the agent at the start of a new conversation. It is indexed by User Id and Session Id.
Key Concept: The session boundary from an agents perspective is something that needs to be decided based on the use-case and experience desired.
Line 88 is where the Agent Runtime is triggered in an async manner with the Application Name, User Id, Session Id, and the Query. The Application Name is important in case we have multiple Agentic Applications being hosted by the same Agent Runner. We would then have to change the session store to also be indexed by the App Name.
Line 90 extracts the final response of the Agent from the session state and is executed once the Agent Runtime has finished executing the Agentic Application (Line 88) which as per our Key Concept earlier is when the final result or an error is produced by the Root Agent.
Beyond Line 90 the method simply extracts the results and returns them.
This code is to show the API Server interacting with the Agent Runtime and must not be used in production. In production use async API style that decouples API Server from the Agent Runner.
Running Agents and Session State Management
ADK defines a session as a conversation thread. From an Agentic App perspective we have three things to think about when it comes to sessions:
- Application Name
- User ID
- Session ID
These three items when put together uniquely identify a particular application handling requests from a given user within a specific conversation thread (session).
Typically, session management requires managing state and lots of record keeping. Nothing very interesting therefore ADK provides a few different types of Session Managers:
- InMemorySessionManager – the most basic Session Manager that is only suitable for demos and learning more about session management.
- DatabaseSessionManager – persisted version of the Session Manager.
- VertexAISessionManager – the pro version which utilizes the VertexAI platform to manage the Session State. Best thing to use with Agent Engine for production workloads.
In this post I use the InMemorySessionManager to show how session management works and how we execute an agentic application.

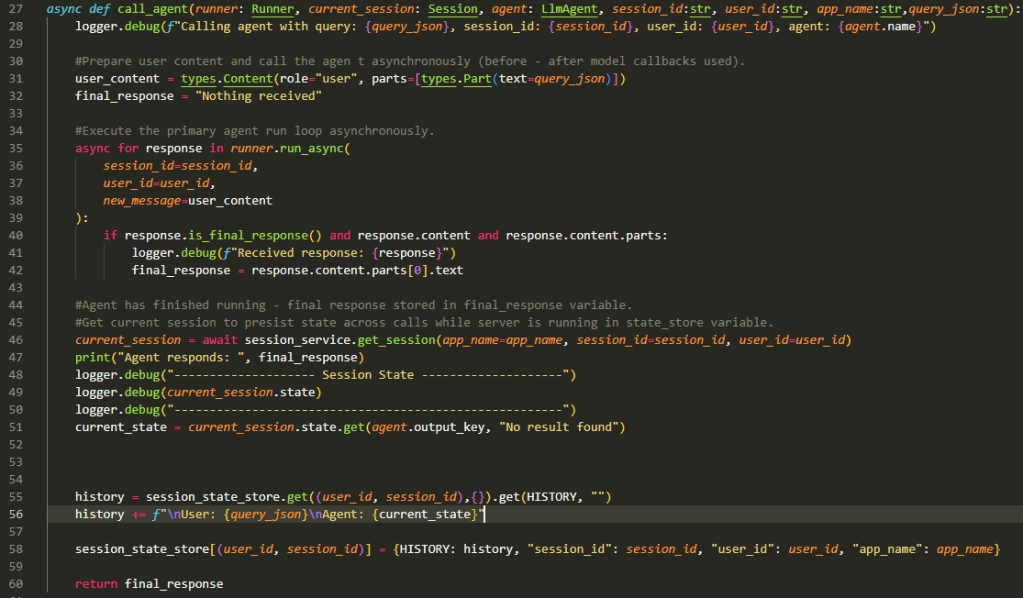
The main method (Line 62 onwards in the above – invoked on Line 88 in previous listing) represents the Agent Runtime (e.g., Agent Engine in GCP) triggering the agents it is hosting (Agent App 1). It is taking the App Name, Session Id, User Id, and the incoming Query as described previously.
The Agent Runner is setup on Line 64.
On Line 66 the Agent Runtime initialises the current session (an instance of InMemorySessionManager) in ADK and provides the starting session state from the session state store. This will either be a freshly initialised session (blank state) or an existing session as per the logic shown previously.
Finally, on Line 69 we use the ‘call_agent’ method to configure and execute the Agent Runner. As you can see we are passing the ‘root_agent’, current session, and other details like session Id and query to this method.
This is the fun bit now…
Lines 31 and 32 are all about extracting what we received from the external application (in this case what the user typed in the chat box) and preparing a ‘default’ response (in case of issues with agent execution).
Lines 35-42 is where the core execution happens for Agent App 1. Since the app is running in async mode it will go through a set of steps where the root agent is triggered and it in turn triggers sub-agents and tools as needed. The async for goes through the responses till the root agent provides the final response signalling the end of the execution of the app. The final response is extracted and stored for eventual return back to the API Server.
Lines 46-51 simply extract the final session state and log it. Nothing interesting there unless you are after an audit trail.
Lines 55-58 is where we build up the session which allows the agents to remember the context and previous inputs/outputs in the conversation session. We extract the current state from the state store, add to it the user’s request and the agent’s response (think of it like adding a request – response pair). Finally the state store is updated (using the ‘history’ key) so when user responds to the agent’s current output the session history is available to guide the agent on what to do next.
The session history is also called Short Term Memory. When you use VertexAISessionManager with Agent Engine or the ‘adk web’ testing utility you get all of this for free. But now you know how it works!
Logging and Monitoring
Line 35 is where we enter the mysterious async-probabilistic realm of Agent Execution and we need logging and monitoring to help us comprehend the flow of the agent execution as the control passes between Agents and from Agents to tools.
Utilities like ‘adk web’ show the flow of control within the Agentic Application through a connected graph. But how does this work? What mechanisms are available for developers to get telemetry information? By default Agent Runtimes like Google’s Agent Engine provide built-in capability to generate telemetry using OpenTelemetry standard that can then be consumed by likes of Cloud Trace or AgentOps.
In this section we look at the internals of the root agent and see how we collect information as it executes. I also show my own (vibe-coded no less) version of the ‘adk web’ flow visualisation.
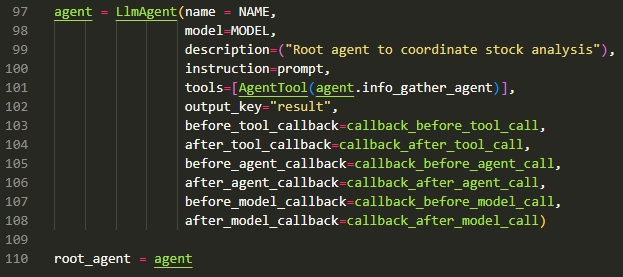
The root agent is defined in Line 97 as per the standard constructor for LLMAgent till Line 103.
We see the usual parameters for the name, model, description, instruction (prompt), tools (using Agent as Tool paradigm) and the output key for the root agent.
Then come the callbacks (Lines 103-108) that allow us to track the flow of the Agent application. There are six types of callbacks and between them they tap the strategic points in the Agent-Agent and Agent-Tool flows.
Before and After Tool: wraps a tool call. This allows us to tap into all the tool calls the agent makes and any responses returned by the tool. This is also the place to execute critical guardrails around tool calling and responses.
Before and After Model: wraps the call to the Large Language Model. This allows us to tap into all the prompts going into the LLM and any responses returned by the Model. This is also the place to execute critical guardrails around input prompts and responses – especially to ensure LLMs are not called with unsafe prompts and any harmful responses blocked.
Before and After Agent: wraps the call to the agent which allows us to tap into all the inputs going into the agent (including user inputs and agent requests) and any outputs.
These callbacks are defined at the level of the agent therefore, it can be used to track the flow through the Agent App 1 going from one agent to another.
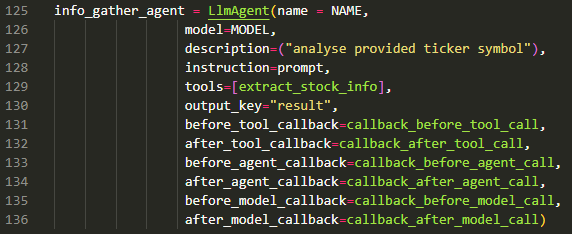
The above shows callbacks registered for the Sub-Agent (named info_gather_agent).
Callbacks
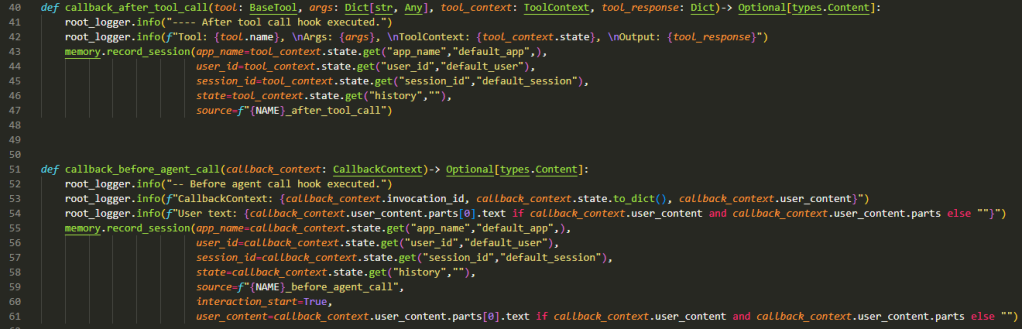
The above examples show two callback examples out of the 6 possible for the root agent. The standard pattern I have used is:
- Log the input provided using python logging for audit purposes.
- Record the complete trace of the short term memory as a memory record (in MongoDb) for us to visualise the flow.

In the flow diagram above we see:
- Time flowing from top of the image to the bottom.
- Human input as the blue dots.
- Purple dots are the Sub-Agent (called info_gather_agent).
- Green dots are the Root Agent’s response.
- Yellow dots are tool calls.
Given we use Agent as tool for communication we see Yellow -> Purple -> Yellow signifying the Root Agent invoking the Sub-Agent as a tool.
Yellow -> Green -> Yellow is the Sub-Agent responding to the Root Agent and the Root Agent processing that input.
Green -> Blue -> Yellow is the Root Agent responding to the Human and the Human responding with a follow up question.
This visualisation was completely vibe-coded based on the document structure of the memory record in MongoDb.
Key Concept: Note the short return trace after ‘were we talking about aapl’ the last question from the Human. The Root Agent does not need to engage with any other agent or tool. It can simply examine the history we have been collecting to answer the question.
Chat App output can be seen below (entry in blue is the human asking questions and grey is the Root Agent responding):
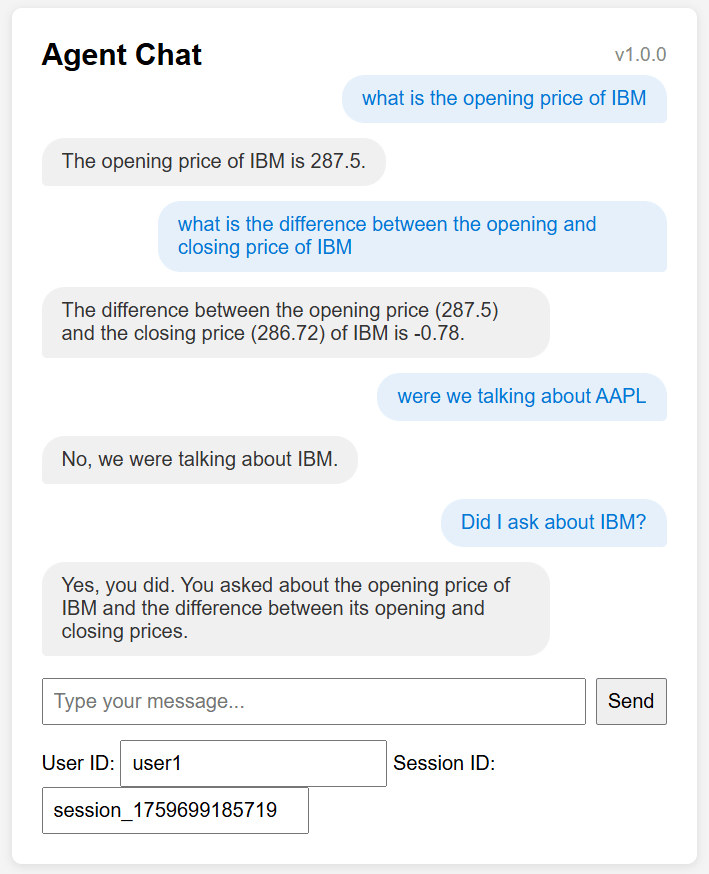
The Chat web-app was also vibe coded in 10 mins just to have something visual to show instead of Postman requests.
It also shows how the web-app could collect User Id and Session Id defaulting to the ‘application-led’ ID and Authorisation model.
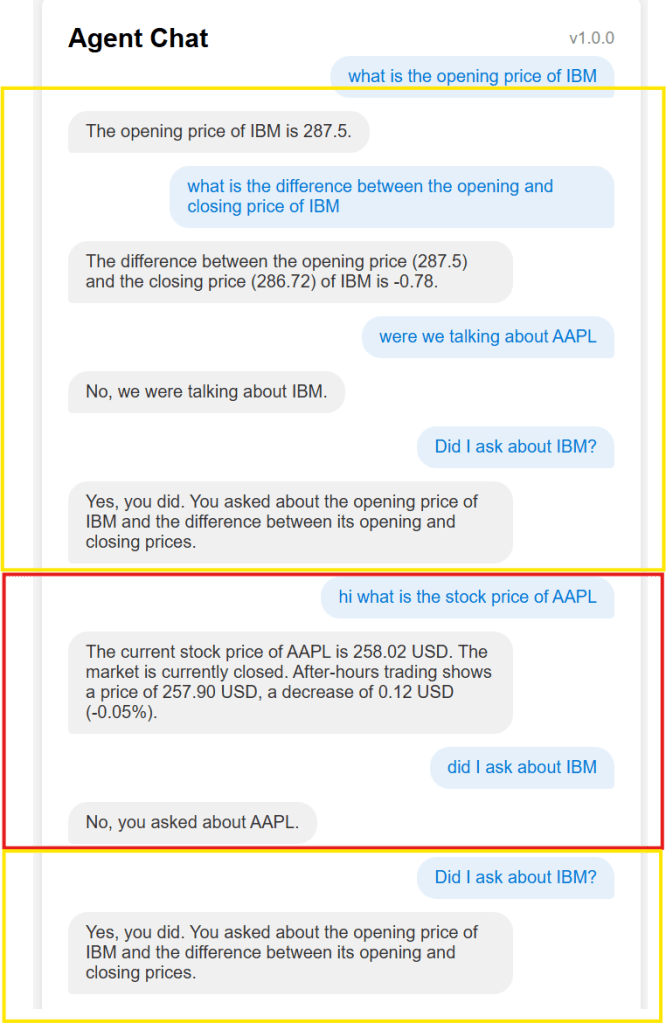
We can play around with the session Ids to give parallel chat experience (same user with two open sessions) – see above.
session_1759699185719 – talking about IBM stock (yellow boxes)
session_1759699185720 – talking about AAPL stock (red box)
Code
By now I hope you are ready to start playing around under the hood to improve your understanding of the tech. Remember concepts never die – they just become abstract implementations.
The complete code can be found here: https://github.com/amachwe/agent/tree/main/agents
main.py has the Agent Runtime.
agent.py in the root is the root agent.
the folder sub_agents contains the info_gather_agent.
memory.py is the vibe-coded memory visualiser (you will need MongoDb running so that short term memory trace can be stored).
https://github.com/amachwe/agent/blob/main/chat_client.html – contains the vibe-coded chat webapp.
