This is the fifth post of the series on Artificial Neural Networks and the 100th post on my blog!
To get the maximum benefit out of this post I would recommend you read the series in order, especially the post on Restricted Boltzmann Machines:
- Artificial Neural Networks: An Introduction
- Artificial Neural Networks: Problems with Multiple Hidden Layers
- Artificial Neural Networks: Introduction to Deep Learning
- Artificial Neural Networks: Restricted Boltzmann Machines
Training:
So far we have looked at some of the building blocks of a deep learning system such as activation functions, stochastic activation units (RBMs) and one-hot encoding to represent inputs and outputs.
Now we put it all together and talk about how we can train such deep networks while avoiding problems related to vanishing gradients. If you have followed the series you might have picked up the hint about using a combination of layer-by-layer training along with the traditional ‘back-prop’ based whole network training.
If not, well that is exactly what happens – usually some sort of Greedy Unsupervised Learning algorithm is applied independently (called ‘pre-training’) on each of the hidden layers, then network wide ‘fine-tuning’ is carried out using Supervised Learning methods (e.g. back-propagation).
The easiest way to understand this is to think about when you are faced with an untidy room one possible approach is to sort out things in a localised way – pick up the books, fold the clothes, tidy the bed one at a time.. this is a greedy approach – you are optimizing locally without worrying about the whole room.
Once the localised items have been sorted, you can take a look at the full room and do bits and pieces of tidying up (e.g. put stacked books on the book shelf, folded clothes in the cupboard).
Contrastive Divergence (CD) is one such method of Localised (Greedy) unsupervised learning (pre-training). We will discuss it next. It might be useful to review the post on Restricted Boltzmann Machines (see list at the top of this post) because I will use some of those concepts to illustrate the logic behind CD.
Pre-training and Contrastive Divergence (CD):
Also known as CD or CD-k where k stands for number of iterations of CD carried out (usual value is either 1 or 10 – so most often you will see CD-1 or CD-10).
Conceptually the method is simple to grasp.
- We make continuous and overlapping pairs out of the input and N hidden layers (the Output Layer is excluded).
- Select next pair of Layers (starting from the pairing of the Input Layer and Hidden Layer 1)
- Pretend that the layer nearest to the input is the ‘visible’ layer and the other layer in the pair is the ‘hidden’ layer
- Take batch of training instance and propagate them through any layers to the ‘visible’ layer of the selected pair – thereby forming a local ‘training’ batch for that pair
- Update Weights using CD-k between that pair using the localised training batch
- Go to Step 2
Confused as to the utility of pretending a hidden layer is a ‘visible’ layer? Don’t worry, it just gets crazier! Before we get into the details of Step 5, I want to make sure that the process around it is well understood with a ‘walk through’.
The first pair will be Input Layer and Hidden Layer 1. Input Layer (IL) is the ‘visible’ layer and the Hidden Layer 1 (HL1) is the ‘hidden’ layer.
As the Input Layer is the first layer of the network we do not need to propagate any values through. So simply present one training instance at a time and use CD (Step 5) to train the weights between IL and HL1 and the biases.
Then we select the next pair: Hidden Layer 1 and Hidden Layer 2. Here we pretend HL1 is the ‘visible’ layer and HL2 is the ‘hidden’ layer. But the training batch needs to be localised to the layer as the ‘raw’ inputs will never be presented directly to HL1 when we use the network for prediction, thus we present the training instances one at a time to the input layer, and using the weights and biases learnt in the previous iteration – propagate them to HL1 thereby creating a ‘localised’ training batch for the pair of HL1 and HL2. We again use CD (Step 5) to train.
Then we select the next pair: Hidden Layer 2 and Hidden Layer 3, create a localised training batch, use CD, move to the next pair and so on till we complete the training of all the hidden layers.
The Output Layer is excluded, so the final pairing will be of Hidden Layer N-1 and Hidden Layer N. As you might have guessed we use the global training step to train the Output Layer. It is also possible to restrict the global supervised training to just the Output Layer if that gives acceptable results.
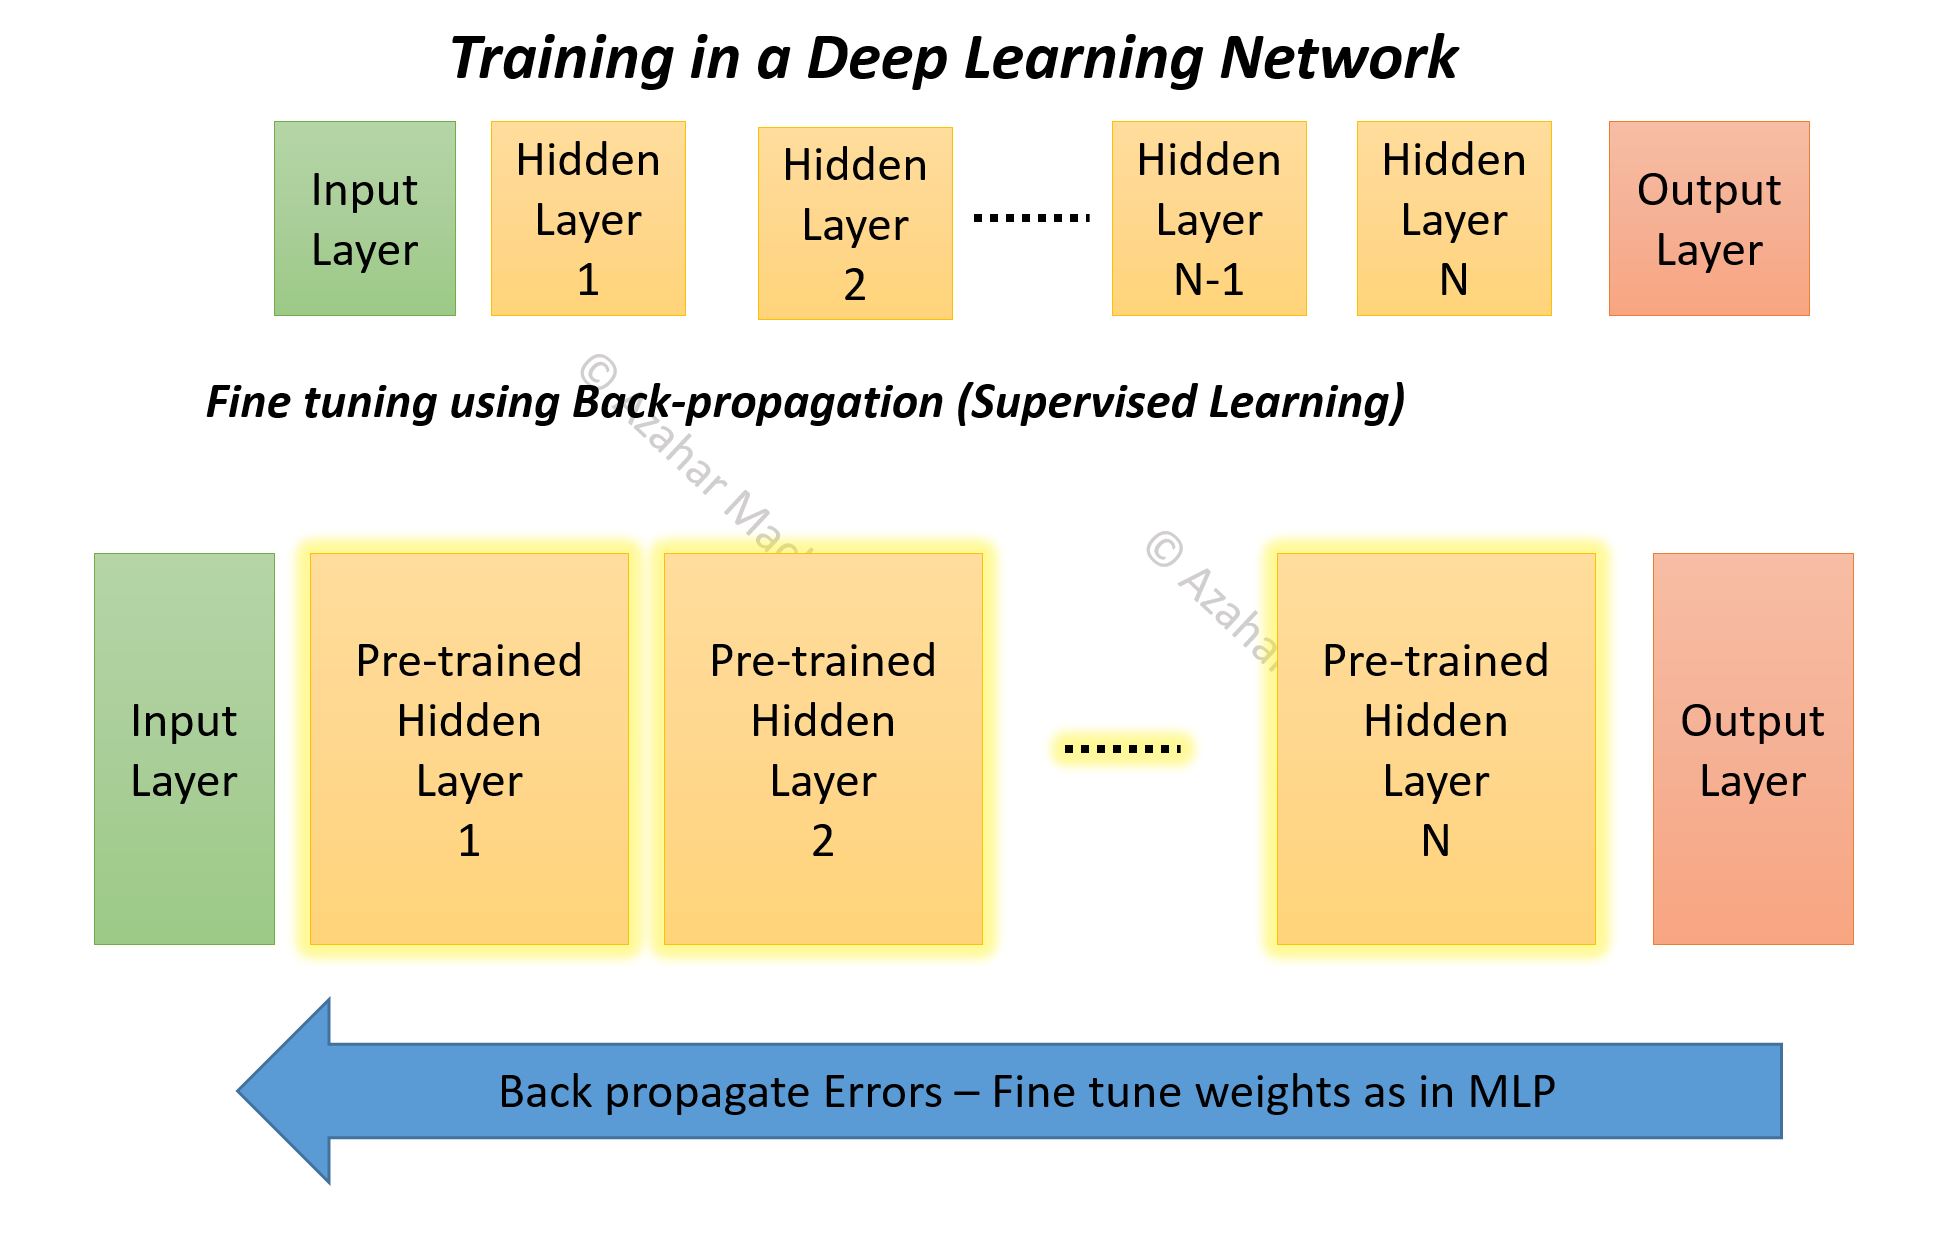
The diagram below describes the basic procedure of pre-training.

Contrastive Divergence:
This is where things get VERY VERY interesting. If you remember from the previous post – we associate output distributions with various inputs (given the stochastic nature of RBM).
Ideally what we want is as we train a hidden layer, the distribution for the output of that layer becomes more defined and less spread out. As a limiting case we would like the output distribution to have a just one or two high probability states so that we can confidently select them as the output states associated with that input.
This is just what one would expect if we had non-stochastic output where, all other parameters remaining the same, each input is only ever associated with a single output state.
I show an example below, the two graphs are output distributions for the same input. As you might have guessed the top graph is before training and the bottom graph is after the training. These are log plots so even a small difference in the score (Y-axis) is quite significant.

Thus the central principle behind CD is that we ‘sample’ different combinations of inputs and outputs for a given set of training inputs. Using binary outputs makes sampling lot easier because we have countable, category outputs (e.g. 6 bit stochastic output = 64 possible categories). If we had a real number stochastic output then we would have potentially infinite output combinations. That said – there are examples where real number stochastic outputs are used.
At this stage because we are training a hidden layer (which we will never directly observe when the network is being used for prediction) we cannot use the corresponding output value from the training data as a guide.
The only rough guide to training we have is the fact that we need to modify the model parameters (weights and biases) in such a way that overall the high-probability associations are promoted (for the training inputs) and any ‘noise’ is removed in the final output distribution of that layer.
The approach we are taking is a ‘generative’ approach where we are seeking information about p(x, y) as compared to a ‘discriminative’ approach which seeks information about p(x | y) if x is the class label and y is the input. If you are curious about how the to approaches relate to each other and how p(x, y) can be obtained from the conditional distributions read about the
Chain Rule in Probability: p(x, y) = p(x | y) * p(y) = p(y | x) * p(x)
and the resulting
Bayes Rule: p(x | y) = p(y | x) * p(x) / p(y)
Sampling and Tuning the Model:
The image below describes how we collect the samples.
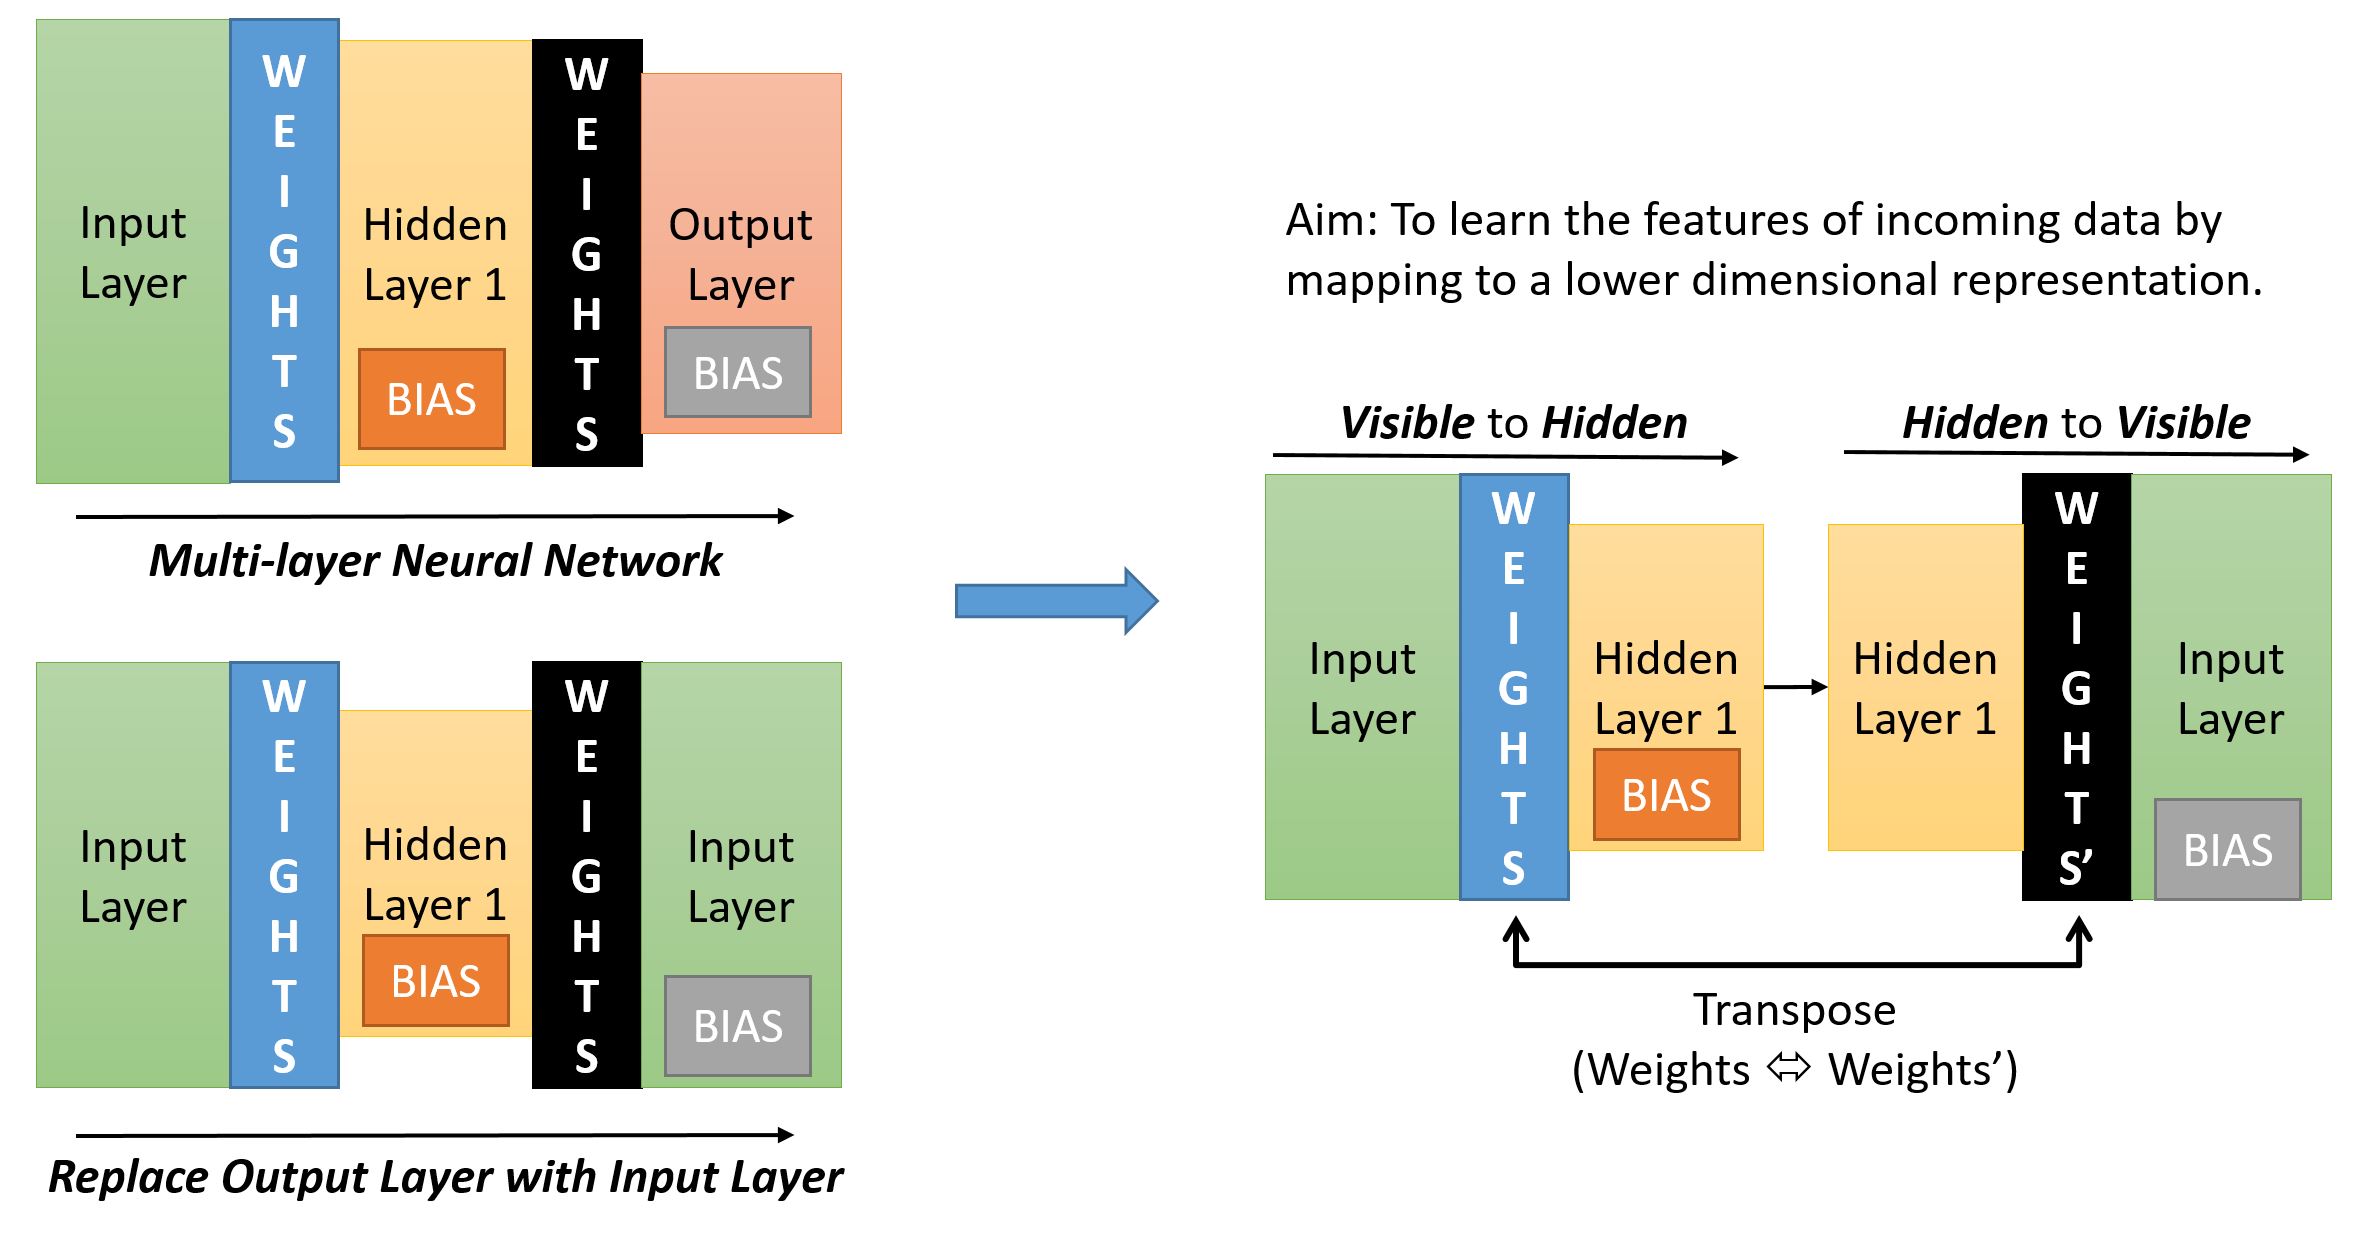
If we start with a normal multi-layer neural network (top left) – we find that usually the shape (in terms of number of neurons in a layer) resembles a pyramid – with the Input Layer having the maximum number of neurons and the Output Layer the minimum. The Hidden Layer is usually wider than the Output Layer but narrower than the Input Layer.
If we were to replace the Output Layer with the Input Layer (bottom left) we get a symmetric network.
To get to the layer pairing required for CD (as described previously) we just need to ensure that there is only ever one set of Weights between the paired layers (though we will have two different sets of Biases – one for Hidden Layer one for Visible Layer).
In the diagram below (on the right side) we see what the pairing would look like. In our example below the Input Layer is the visible layer and the Hidden Layer 1 is the hidden layer.
For the Sampling:
The sampling process is called ‘Gibbs Sampling’ and it involves step by step sampling from the forward and backward propagation results. See this post on Gibbs sampling for the theory behind it.
Lets keep x as the input to the visible layer and y as the output at the hidden layer. When we do the reverse propagation, following the method of Gibbs sampling, we give the output at the hidden layer back into the hidden layer – which is now the ‘visible’ layer as the input. The resulting output we get at the input layer – which is now the ‘hidden’ layer is the next value of x.
In detail:
Forward Propagation: When we propagate from visible to hidden we use the normal Weights matrix and the Bias for the Hidden Layer. I call this the forward sample – p(y|x)
Reverse Propagation: When we propagate from hidden to visible we take the transpose of the existing Weights matrix and the Bias for the Visible Layer. I call this the reverse sample – p(x|y)
We use Bernoulli Trials at both ends so our sample is always a bit string. But we also record the sigmoid output as the ‘activation’ probability for the training.
The sampling process is starts by clamping one input from our training batch, call it T[i], at the first pair of layers (Input Layer – Hidden Layer 1 – HL1). You can setup the biases for the two layers and the weights between them using a normal distribution with mean of 0 or as constant value of all zeroes.
- We generate the initial y[0] value at HL1 using T[i] as the input by performing forward propagation. Call this a forward sample.
- Then we take y[0], clamp it at HL1 as an input, do reverse propagation and get a reverse sample x[1].
- Then we take x[1], clamp it on the Input Layer do forward propagation and get the next forward sample y[1].
- Then we take y[1], clamp it at HL1 as an input, do reverse propagation and get the next reverse sample x[2].
- This keeps going till we get reach the kth pair of x and y (namely x[k], y[k]). Then we use the data from the initial and kth pairs to calculate the weight and bias updates.
We then use the next input from the training batch (T[i+1]) and perform the above steps and do a weight/bias update in the end.
Weights Update:
To update the weights between the jth neuron in the visible layer and the ith neuron in the hidden layer, we use the following equation:
w[i][j] = w[i][j] + { p(H[i] = 1 | v[0]) x v[j][0] } – { p(H[i] = 1 | v[k]) x v[j][k] }
The terms in bold can be simplified as:
w[i][j] = w[i][j] + { A x B } – { C x D }
where:
A = p(H[i] = 1 | v[0]): The probability of the ith hidden layer unit to be turned on given the ‘training’ input at the visible layer at the first step of the Gibbs Sampling process.
B = v[j][0]: The sample value at the jth visible layer unit for the ‘training’ input presented
C = p(H[i] = 1 | v[k]): The probability of the ith hidden layer unit to be turned on given the kth sample of the input vector (at the kth step of the Gibbs Sampling process).
D = v[j][k]: The sample value at the jth visible layer unit for the input sampled at the kth step
A and C are basically the sigmoid outputs for the hidden layer at the start and end of the sampling process. The reason we take the sigmoid and not the Bernoulli trial result is because the sigmoid result is a probability threshold whereas the trial result is an outcome based on the probability threshold.
B and D are the initial (training) input and the final input sample obtained at the kth step of the Gibbs Sampling process.
Bias Update:
For the jth visible unit the new bias is simply given by:
b[j] = b[j] + (v[j][0] – v[j][k]) – this is same as items B and D in the weights update.
For the ith hidden unit the new bias is given by:
c[i] = c[i] + (p(H[i] = 1 | v[0]) – p(H[i] = 1 | v[k])) – this is the same as the items A and C in the weights update.
The Java code can be found here (see the Contrastive Divergence method).
The only way the weights can affect the output distribution is by modifying the probability threshold to ensure the removal of ‘noise’ from the resulting distribution. That is the only way to ‘tame’ the output distribution and link it with the input.
Once we have fully trained the current pair of layers, we move to the next pair and perform the above steps (as described before).
The idea here is to use a mini-batch of training data for CD and limiting k to a value not larger than 10 so that pairwise training of layers can proceed quickly.
This is greedy training because we are not worried about the overall effect on the network of our weight changes.
As we train the pair of layers starting from Input-HL1 pair, we are in essence learning to recognise individual features in the input data and their combinations that can help us classify one input from the other. Practically speaking at this level we are not worried about the output label, because if we can effectively distinguish between inputs using lower number of dimensions then those outputs are effectively a ‘class label’.
As a simple example of a neural network with 12 bit input layer (12 units – 4096 possible inputs), 6 bit hidden layer (6 units – 64 possible output states) and 2 bit output layer (2 units – 4 possible output states).
If we are able to, through CD-k, associate each type of the 4096 bit inputs with one of the 64 hidden unit states then effectively we have created a system that can recognise features in the input and encode for those features using a reduced dimension representation. From a 12 bit representation we are then encoding the feature space using a 6 bit representation.
Taking this reasoning to the next level, when we train the HL-1 and HL-2 pair we are learning about patterns of feature combinations one level up from the raw input. Similarly HL-2 and HL-3 pairs will learn about patterns of feature combinations two-levels up from the raw input and so on…
Why the pairing?
As a final point if you are thinking why the pairing up of layers, why not have a 3, 4, 5 layer group. The reason is if we have just two layers as a pair and we make sure the visible layer input is not the raw input but the in fact the propagated value (i.e. a localised input for that layer), then we are making sure that the output of each hidden layer unit is dependent only on the layer below. This makes the conditional probability lot simpler, if we had multiple layers we would end up with complicated conditional probability dependencies (e.g. value of Layer 4 given value of Layer 3 given value of Layer 2). In other words it makes correlation between features be only dependent on the layer below, this makes the feature correlation lot easier.
Fine Tuning:
We now need to ensure that the network is fine tuned from the Output side as we have already prioritized the Input during the pre-training.
Hint: Carrying on with the example, when we do the fine tuning training (described in the next post) our main task will be to associate the 64 hidden unit output states with one of the 4 actual output states. That is another reason why we can attempt to use normal back-prop to do the fine tuning – we do not care if the gradient vanishes as we move away from the output layer. Our main target is to train the upper layers (especially the Output Layer) to associate higher level features with labelled classes. With the CD-k we have already associated lower level inputs with a hierarchy of higher level features! With that said we can find that back-prop with its vanishing gradient problem does not give the desired results. Perhaps because our network is deep enough for the vanishing gradient problem to have a significant impact especially on training the layers closer to the Input layer. We then might have to use a more sophisticated algorithm such as the ‘up-down’ algorithm.
The diagram below gives a teaser of how the back-prop process works.
More about Fine-Tuning in the next post!
