Thoughts on Error Handling

Most code has natural boundaries as defined by classes, functions and remote interfaces.

The execution path for a program creates a chain of calls across these boundaries, tears it down as the calls complete and again builds it up as new calls are made.

All is well till one of the calls does not complete successfully. Then an exception is thrown which travels all the way up the chain and somewhere along the line it comes across your code. Or maybe it was a call to your code that does not complete successfully!

What to do when this happens? How to handle the exception?

Do you log it and carry on or do you stop the execution and bomb out or you could just carry on pretending nothing is wrong.

There is no single right answer to this question, just a set of good options that you get to pick from:

1) Log a warning message

This option is easy to understand and easier to forget while writing code. It should be combined with all the other options to give better visibility.

The key to effective logging is first choosing the right Logging API and then using the chosen Logging API correctly! It is a common feature of software to have to little or two much logging. Or the bad use of Error Levels where Level ERROR gives a trickle of messages where as Level INFO floods the logs with messages. Level WARN is often bypassed and Level DEBUG often misused to do ‘machine-gun’ logging.

For secure systems logging should be done carefully so as to not expose any information in an unencrypted log file (e.g. logging user credentials, database server access settings etc.).

Use Level ERROR for when you cannot continue with normal execution (e.g. required data files are missing or required data is not valid)

Use Level WARN for when you can continue but with limited functionality (e.g. not able to connect to remote services – waiting to retry)

Use Level INFO for when you want to inform the user about interesting events (like successfully established a connection or processed a certain number of records)

Use Level DEBUG for when you want to peek under the hood of the application (like logging properties used to initiate a connection or requests sent/response received – beware this is not very secure if logged to a general-access plain text file)

This option should be used no matter which of the other options is chosen. There is nothing as annoying as an application failing with just an error message and nothing in the logs or seeing an exception flash on the console a second before it closes.

2) Return a constant neutral value

In case of a problem we return a constant neutral value and carry on as if nothing happened. For example if we are supposed to return a Set of objects (either from our code or by calling another method) and we are unable to do that for some reason then you can return a blank Set with no items – this would be a constant Set variable which is returned as a neutral value.

For the code that calls this method, we absorb the exception propagation. The only way the calling code can detect any problems is if it treats the returned ‘neutral’ value as an ‘illegal value’. It can use one of the options presented here or ignore it and carry on.

Best Practice: If you are using a neutral constant return value(s) in case of an error make sure you do two things; log the error internally for your reference and make sure if it is an API method you document the fact. This will make sure anyone who calls your code knows the constant neutral value(s) and can treat them as illegal if required.

Another way to use a neutral constant value is to define a max and min range for the return value. In case the actual value is above the max or below the min value then replace it with the relevant constant value (MAX_VALUE or MIN_VALUE).

3) Substitute previous/next valid piece of data

In case of a problem we return the last known or next available valid value. This is fairly useful at the edge of your system where you are dealing with data streams or large quantities of data where it is required that all calls return valid data and not throw any exceptions or revert to constant values (for example a stream of currency data where one call to the remote service fails). You would want to also provide a neutral constant value as well in case there are issues at the beginning where no valid values are present.

For the calling code this provides no mechanism to detect any exceptions down the chain. So the called code that implements this behaviour absorbs all exceptions. That is why this is really useful for the edge of your system when dealing with other remote services, databases and files. If you use this technique make sure you log the fact that you are skipping some invalid values till you get a valid one or you have not been able to get a new valid value so you are re-using the previous one, that will make sure you can detect issues with the remote systems and inform the user (e.g. database login credentials not valid, remote service unavailable or few data file entries are corrupt) while making sure your internal code remains stable.

Also make sure you document this behaviour properly!

4) Return an error code response

This is fairly useful when building a remote or packaged API for external consumption especially when indicating internal errors which the user can do little about. Some examples include: an internal service is no longer responding, internal file I/O errors, issues related to memory management on the remote system etc.

Error codes make it easier for users to log trouble tickets with the help-desk.

Once with the help-desk the trouble ticket can then be routed based on the error code (e.g. does O&M Team just need to restart a failed service or is this a memory leak issue which needs to be passed on to the Dev Team).

We should be careful not to return error codes for issues that can be resolved by the user. In those cases a descriptive error message is the way to go.

As an example: assume you have a form which takes in personal details of the user and then uses one or more remote services to process that data.

– For form validations (email addresses, telephone numbers etc.) we should return a proper descriptive error message.

– For issues related to network connectivity (remote service not reachable) we should return a proper descriptive error message.

– For issues related to the remote service which the user cannot do anything about (as described earlier) the error code should be returned with link to the help-desk contact details and perhaps more information (maybe an auto generated trouble ticket id – see next section).

5) Call an error processing routine/service

This is one where we detect an error response and call an error processing routine or service. This is especially use full not just for complex rule-based logging but also for automatic error reporting, trouble ticket creation, service performance management, self-monitoring etc.

It is often useful to have a service that encapsulates error handling logic rather than have your catch block or return value checks peppered with if-else blocks.

In this case the error response or exception is passed on to a service or routine that encapsulates the error processing logic. Some of the things that such a service or routine might do:

– Decide which log file to log the error in

– Decide the level of the error and create self-monitoring events and/or change life-cycle state of the system (restart, soft-shutdown etc.)

– Interface with trouble ticketing systems (e.g. when you get a major exception in Windows 7 OS it offers to send details to Microsoft)

– Interface with performance monitoring systems to report the health of the service

6) Shutdown (Fail-fast)

This means that the system is shutdown or made un-available as soon as any exception of significance is detected.

This behaviour is often required from critical pieces of software which should not work in a degraded state (so called mission critical software). For example you don’t want the auto-pilot of an A380 to work when it is getting internal errors while performing I/O. You want to kill that instance and switch over to a secondary system or warn the pilot and immediately transfer control to manual.

This is also very important for systems that deal with sensitive data such as online-banking applications (it is better to be not available to process online payments than to provide unreliable service). Users might accept a ‘Site Down’ notice but they will definitely NOT accept incorrect processing of their online payment instructions.

From the example above, because we failed fast and made the banking web-site unavailable we did not allow the impact of the error to spread to the user’s financial transaction.


Java: Getting a webpage using java.net

There is an easy way to get a web page as a HTML string. In fact there are two basic ways to do this using the basic java.net package. Why would we need this?

Some use-cases include:

  • Getting information from a web-page for text aggregation (say from a news site)
  • Creating a ‘page filter’ which pre-processes web-pages to strip out unsafe content

For both the examples we will use the basic java.net.URL and java.net.URLConnection entities in java.net package.


Type 1: Encapsulated Side-effects

The first example opens up the URL connection and obtains an InputStream from it. A BufferedReader wraps the InputStream from the URL which is then read into a StringBuilder. Then we return the String containing the HTML page source (if all goes well).

The code listing:


java.net.1

Few points to remember:

– Always use a StringBuilder instead of the concat ‘+’ operator, Strings are immutable which means every time you call ‘+’ a new String object is born. StringBuilder uses a character array.

– Always make sure to have proper exception handling and a finally block which closes the InputStream

This code encapsulates the ‘side-effect’ of reading from a remote URL and returns a String data.

 Type 2: Exposed Side-effects

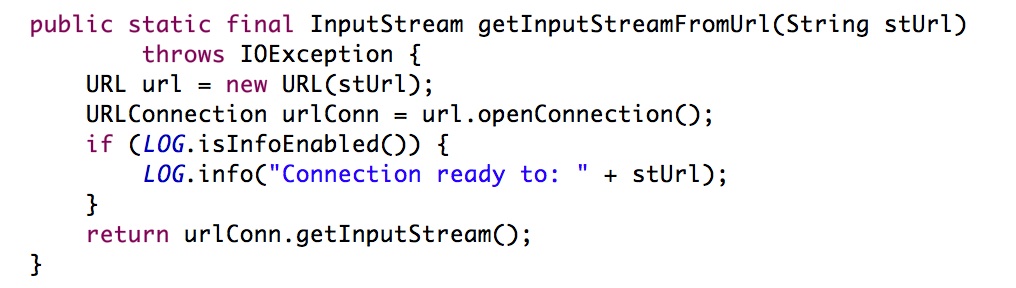
The second example is very simple. It is a sub-set of the code shown in the previous section.

In this second example we simply open the URL connection and obtain an InputStream from it which we return to the calling program. The responsibility of using the InputStream to get the page source is left to the calling function. This is especially useful if you want to work directly with an InputStream instead of a String representation. One such example is when using a parser to parse the page source.

The big disadvantage of using this method is that it exposes the side-effect related code to the main application. For example if the Internet connection goes down or the server goes down while the InputStream is being read the calling application will encounter an error and therefore behave unpredictably.

java.net.2

The way to get the best of both worlds (encapsulated side-effects and providing an InputStream to a calling function) is to use Example 1 and return a String object which can then be converted into a ‘byte stream’.

Living with ActiveMQ JMS – Nice Features and Weird Errors

Apache ActiveMQ is the bad-boy of all the JMS servers out there. Firstly it is ‘free’. Secondly it is very good. For those who think free does not go with good (like I did) – well, lets just say life got a bit sweeter for them.

Auto-failover

ActiveMQ provides built-in failover handling. Failover handling is very important for any kind of JMS application. Failover handling means deciding what to do when something bad happens which is outside your control.

For example your application has subscribed to a Topic but the JMS server drops the connection or the network link goes down. Your application is left with a JMS error and a dead connection to deal with.

There are several things you might want to do in that case, such as:

– Try reconnecting after some time and keep on trying till you can reconnect

– Switch over to another JMS server (if present)

We might also need to configure things like how soon to reconnect, which URL to treat as primary (in case of switching).

As ActiveMQ provides this functionality ‘out-of-the-box’ it makes life easier. The way to implement this is very simple as well. We just add the failover settings to the Naming URI in the JMS Connection settings.

A normal JMS Naming URI looks like: tcp://hostname:port (e.g. tcp://localhost:6666)

If we wanted to use the ActiveMQ specific failover we change the JMS Naming URI as:

For a single server auto-reconnect –

failover://(tcp://hostname:port) or failover:(tcp://hostname:port)
*Try both the versions (with and without the //) and see what works in your specific case.

In this case if the connection goes down for some external reason, ActiveMQ will try and reconnect.

For a backup-server auto-switching –

failover:(tcp://primary:61616,tcp://secondary:61616) or 
failover://(tcp://primary:61616,tcp://secondary:61616)
*Again try both the versions (with and without the //) and see what works in your specific case.

In this case if the primary connections goes down then ActiveMQ will try and switch to the secondary. In case both servers are active (e.g. for load-balancing) we may want to choose randomly between the two or in case of primary-secondary we may want start with primary first and keep the secondary for failover. We can do this by using the ‘randomize’ option:

failover:(tcp://primary:61616,tcp://secondary:61616)?randomize=false

Here randomize=false means the primary URI will be tried first.

Check the URL in the reference section for more configurations.

[Further Reference: http://activemq.apache.org/failover-transport-reference.html]

Weird Errors

javax.jms.JMSException: Failed to build body from bytes. Reason: java.io.StreamCorruptedException: invalid type code: 09

If you see this error in your application when trying to call the getObject method on an ‘Object Message’ it means something has gone wrong when you tried to de-serialize the object at your end.

This error is thrown when the Java IO library does not recognize the type code its found in the object data.

This is most often caused by mismatched ActiveMQ libraries between the sender (which serializes the object) and receiver (which de-serializes it).

If you have no control on the sending application then its time to hold your head in your hands and cry. You just learned a valuable lesson – if you are using JMS to decouple your applications then ALSO use a neutral message format (like XML) instead of serialized objects.

Efficient Data Load using Java with Oracle

Getting your data from its source (where it is generated) to its destination (where it is used) can be very challenging, especially when you have performance and data-size constraints (how is that for a general statement?).

The standard Extract-Transform-Load sequence explains what is involved in any such Source -> Destination data-transfer at a high level.

We have a data-source (a file, a database, a black-box web-service) from which we need to ‘extract’ data, then we need to ‘transform’ it from source format to destination format (filtering, mapping etc.) and finally ‘load’ it into the destination (a file, a database, a black-box web-service).

In many situations, using a commercial third-party data-load tool or a data-loading component integrated with the destination  (e.g. SQL*Loader) is not a viable option. This scenario can be further complicated if the data-load task itself is a big one (say upwards of 500 million records within 24 hrs.).

One example of the above situation is when loading data into a software product using a ‘data loader’ specific to it. Such ‘customized’ data-loaders allow the decoupling of the products’ internal data schema (i.e. the ‘Transform’ and ‘Load’ steps) from the source format (i.e. the ‘Extract’ step).

The source format can then remain fixed (a good thing for the customers/end users) and the internal data schema can be changed down the line (a good thing for product developers/designers), simply by modifying the custom data-loader sitting between the product and the data source.

In this post I will describe some of the issues one can face while designing such a data-loader in Java (1.6 and upwards) for an Oracle (11g R2 and upwards) destination. This is not a comprehensive post on efficient Java or Oracle optimization. This post is based on real-world experience designing and developing such components. I am also going to assume that you have a decent ‘server’ spec’d to run a large Oracle database.

Preparing the Destination 

We prepare the Oracle destination by making sure our database is fully optimized to handle large data-sizes. Below are some of the things that you can do at database creation time:

– Make sure you use BIGFILE table-spaces for large databases. BIGFILE table-spaces provide efficient storage for large databases.

– Make sure you have large enough data-files for TEMP and SYSTEM table-space.

– Make sure the constraints, indexes and primary keys are defined properly as these can have a major impact on performance.

For further information on Oracle database optimization at creation time you can use Google (yes! Google is our friend!).


Working with Java and Using JDBC

This is the first step to welcoming the data into your system. We need to extract the data from the source using Java, transforming it and then using JDBC to inject it into Oracle (using the product specific schema).

There are two separate interfaces for the Java component here:

1) Between Data Source and the Java Code

2) Between the Java Code and the Data Destination (Oracle)

Between Data Source and Java Code

Let us use a CSV (comma-separated values) format data-file as the data-source. This will add a bit of variety to the example.

Using the ‘BufferedReader’ (java.io) one can easily read gigabyte size files line by line. This will work best if each line in CSV contains one data row thereby we can read-process-discard the line. Not requiring to store more than a line at a time in memory, will allow your application to have a small memory footprint.

Between the Java Code and the Destination

The second interface is where things get really interesting. Making Java work efficiently with Oracle via JDBC. Here the most important feature while inserting data into the database, that you cannot do without, is batched prepared statement. Using Prepared Statements (PS) without batching is like taking two steps forward and ten steps back. In fact using PS without batching can be worse than using normal statements. Therefore always use PSs, batch them together and execute them as a batch (using executeBatch method).

A point about the Oracle JDBC drivers, make sure the batch size is reasonable (i.e. less than 10K). This is because when using certain versions of the Oracle JDBC driver, if you create a very large batch, the batched insert can fail silently while you are left feeling pleased that you just loaded a large chunk of data in a flash. You will discover the problem only if you check the the row count in the database, after the load.

If the data-load involves sequential updates (i.e. a mix of inserts, updates and deletes) then also batching can be used without destroying the data integrity. Create separate batches for the insert, update and delete prepared statements and execute them in the following order:

  1. Insert batches
  2. Update batches
  3. Delete batches
One drawback of using batches is that if a statement in the batch fails, it fails the whole batch which makes it problematic to detect exactly which statement failed (another reason to use small batch sizes of ~ 100).
Constraints and Primary Keys
The Constraints and Primary Keys (CoPs) on the database act as the gatekeepers at the destination. The data-load program is like a truck driving into the destination with a lot of cargo (data).
CoPs can either be disabled while the data-load is carried out or they can remain on. In case we disabled them during the data-load, when re-enabling them we can have Oracle check the existing data against them or ignore existing data and only enable it for any new operations.
Whether CoPs are enabled or disabled and whether post-load validation of existing data is carried out can have a major affect on the total data-load time. We have three main options when it comes to CoPs and data loading:
  1. Obviously the quickest option, in terms of our data-load, is to drive the truck through the gates (CoPs disabled) and dump the cargo (data) at the destination, without stopping for a check at the gate or after unloading (CoPs enabled for future changes but existing data not validated). This is only possible if the contract with the data-source provider puts the full responsibility for data accuracy with the source.
  2. The slowest option will be if the truck is stopped at the gates (CoPs enabled), unloaded and each cargo item examined by the gatekeepers (all the inserts checked for CoPs violations) before being allowed inside the destination.
  3. A compromise between the two (i.e. the middle path) would be to allow the truck to drive into the destination (CoPs disabled), unload the truck and at the time of transferring the cargo to the destination, check the it (CoPs enabled after load and existing data validated).
The option chosen depends on the specific problem and the various data-integrity requirements. It might be easier to do the data file validation ‘in memory’ before an expensive data-load process is carried out and then we can use the first option.
Indexes
We need indexes and primary keys for performing updates and deletes (try a large table update or delete with and without indexes – then thank God for indexes!).
If your data load consists of only inserts and you are loading data into an empty or nearly empty table (w.r.t. amount of data being loaded), it might be a good idea to drop any indexes on it before starting the load.
This is so because as the data is inserted into a table, then any indexes on it are updated as well which takes additional time. If the table already contains a lot of data as compared to the the size of the new data being loaded then the time saved by dropping indexes will be wasted when trying to rebuild the index.
After the data is loaded we need to rebuild any dropped indexes and re-enable CoPs. Be warned that re-building indexes and re-enabling CoPs can be very time consuming and can take a lot of SYSTEM and TEMP space.
Logging
Oracle, being a ‘safe’ database, maintains a ‘redo’ log so that in case of a database failure we can perform recovery and return the database to its original state. This logging can be disabled by using the nologging option which can lead to a significant performance boost in case of inserts and index creations.
A major drawback of using nologging is that you loose the ability to ‘repeat’ any operations performed while this option is set. When using this option it is very important to take a database backup before and after the load process
Nologging is something that should be used judiciously and with a lot of planning to handle any side-effects.
Miscellaneous 
There are several other exotic techniques for improving large data loads on the Oracle side, such as partitioned tables. But these require more than ‘basic’ changes to the destination database.
Data-loading optimization for ‘big’ data is like a journey without end. I will keep updating this post as I discover new things. Please feel free share your comments and suggestions with me!


iProcess Connecting to Action Processor through Proxy and JMS – Part 2

Following the first part, I explained the problem scenario and outlined the solution, in this post I present the implementation.

We need to create the following components:

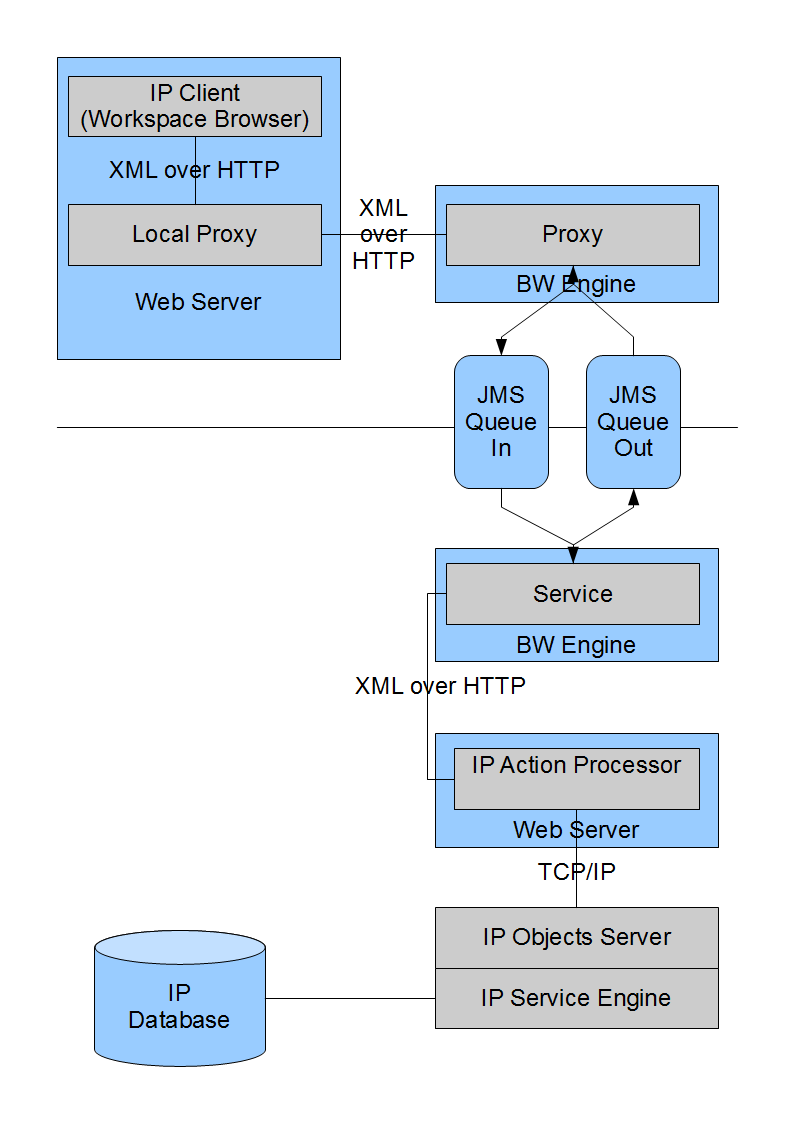
1) Local Proxy – which will be the target for the Workspace Browser instead of the Action Processor which is sitting inside the ‘fence’ and therefore not accessible over HTTP.

2) Proxy for JMS – Proxy which puts the http request in a JMS message and gets the response back to the Local Proxy which returns it to the Workspace Browser.

3) JMS Queues – Queues to act like channels through the ‘fence’.

4) Service for JMS – Service to handle the requests sent over JMS inside the ‘fence’ and to send the response back over JMS.


I will group the above into three ‘work-packages’:

1) JMS Queues – TIBCO EMS based queues.

2) Proxy and Service for JMS – implemented using BusinessWorks.

3) Local Proxy – implemented using JSP.


Creating the TIBCO EMS Queues

Using the EMS administrator create two queues:

1) iPRequestQueue – to put requests from Workspace Browser.

2) iPResponseQueue – to return response from Action Processor.

Command: create queue <queue name>


Proxy and Service for JMS

For both the Proxy and Service to work we will need to store the session information and refer to it when making HTTP requests to the Action Processor. To carry through the session information we use the JMS Header field: JMSCorrelationID.

Otherwise we will get a ‘There is no node context associated with this session, a Login is required.’ error. We use a Shared-Variable resource to store the session information.

Proxy for JMS:

The logic for the proxy is simple.

1) HTTP Receiver process starter listens to requests from the Workspace Browser.

2) Upon receiving a request it sends the request content to a JMS Queue sender which inserts the request in a JMS message and puts it on the iPRequestQueue.

3) Then we wait for the JMS Message on iPResponseQueue which contains the response.

4) The response data is picked up from the JMS Message and sent as response to the Workspace Browser.

5) If the returned response is a complaint about ‘a Login is required’ then remove any currently held session information in the shared variable (so that we can get a fresh session next time).

In the HTTP Receiver we will need to add two parameters ‘action’ and ‘cachecircumvention’ with ‘action’ as a required parameter. The ‘action’ parameter value will then be sent in the body of the JMS Message through the ‘fence’.

In the HTTP Response we will put the response JMS Message’s body as ascii and binary content (convert text to base64), Session information in JMSCorrelationID to Set-Cookie HTTP Header in response, Content-Type Header in response will be “application/xml;charset=utf-8”, Date can be set to the current date and Content-Length to length of the ascii content length (using string-length function).


Service for JMS:

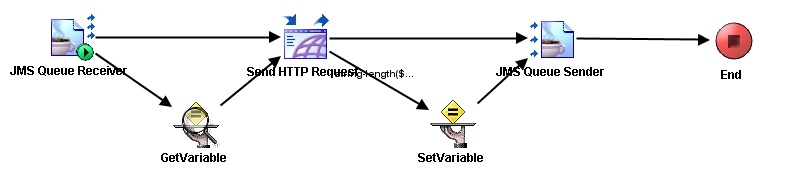
The logic for the Service sitting inside the fence waiting for requests from the Proxy, over JMS, is as follows:

1) JMS Queue Receiver process starter is waiting for requests on iPRequestQueue.

2) On receiving a message it sends the request from the JMS Message body to the Action Processor using Send HTTP Request activity.

3) A Get Variable activity gets us the session information to use in the request to the Action Processor.

4) The response is then sent to a JMS Queue Sender activity which sends the response out as a JMS Message on iPResponseQueue.

5) If the session information shared variable is blank then we set the session information received in the response.

The Send HTTP Request will also have two parameters: ‘action’ and ‘cachecircumvention’ (optional). We will populate the ‘action’ parameter with the contents from the received JMS Message’s body. The session information will be fetched from the shared variable and put in the Cookie header field of the request. We will also put the contents of the JMS Message’s body in PostData field of RequestActivityInput. Make sure also to populate the Host, Port and Request URI to point to the ActionProcessor.

An example, if you Action Processor is located at: http://CoreWebServer1:8080/TIBCOActProc/ActionProcessor.servlet  [using the servlet version] then the Host = CoreWebServer1, Port=8080 and RequestURI=/TIBCOActProc/ActionProcessor.servlet. If you expect these values to change, make them into global variables.


Local Proxy

This wass the most important, difficult and frustrating component to create. The reason I am using a local proxy based on JSP and not implementing the functionality in the BW Proxy was given in the first part, but to repeat it here in one line: using a Local Proxy allows us to separate the ‘behavior’ of the Action Processor from the task of sending the message through the ‘fence’.

The source jsp file can be found here.

The logic for the proxy is as follows:

1) Receive the incoming request from the Workspace Browser.

2) Forward the request received from the Workspace Browser, as it is, to the BusinessWork Proxy.

3) Receive the response from the BusinessWork Proxy also get any session information from the response.

4) Process the response:

a) Trim the request and remove any newline-carriage returns.

b) Check the type of response and take appropriate action – if response has HTML then set content type in header to “text/html”, if response is an http address then redirect             response and if normal xml then set content type to “application/xml”.

c) Set session information in the header.

5) Pass on the response received from the BusinessWorks Proxy, back to the Workspace Browser.


Once everything is in place we need to change the Action Processor location in the Workspace Browser config.xml file. This file is located in <iProcess Workspace Browser Root>/JSXAPPS/ipc/ folder. Open up the XML file and locate the <ActionProcessor> tag. Change the ‘baseUrl’ attribute to point it to the Local Proxy. Start the BW Proxy and Service, iProcess Process Sentinels, Web-Server for the ActionProcessor and the Workspace Browser. Also test whether the Local Proxy is accessible by type out the location in a browser window.

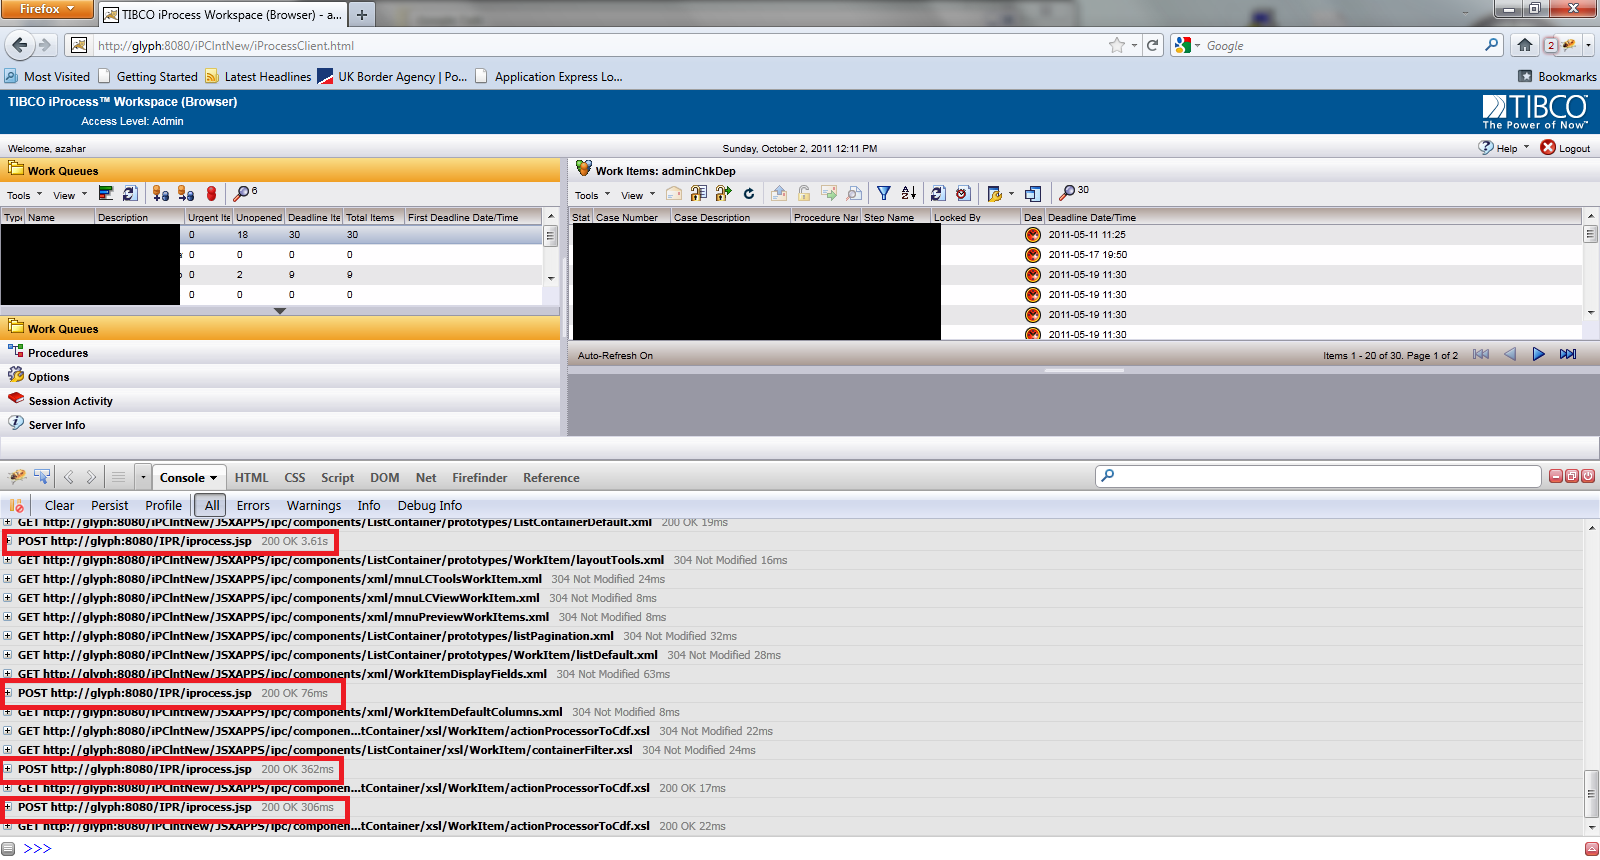
The screenshots given below show the proxy setup in action. The Local Proxy is at: http://glyph:8080/IPR/iprocess.jsp (we would put this location in the ‘baseUrl’). We track the requests in Firefox using Firebug.

In the picture above we can see normal operation of the Workspace Browser. Above we see requests going direct to the ActionProcessor without any proxy.


Above we see the same login screen but this time the Workspace Browser is using a proxy. All requests are being sent to the Local Proxy.


Above we can the Workspace Browser showing the Work Queues and Work Items (I have blacked out the queue names and work item information on purpose). Tracking it in FireBug we see requests being sent to the Local Proxy (iprocess.jsp).


That’s all folks!


iProcess Connecting to Action Processor through Proxy and JMS – Part 1

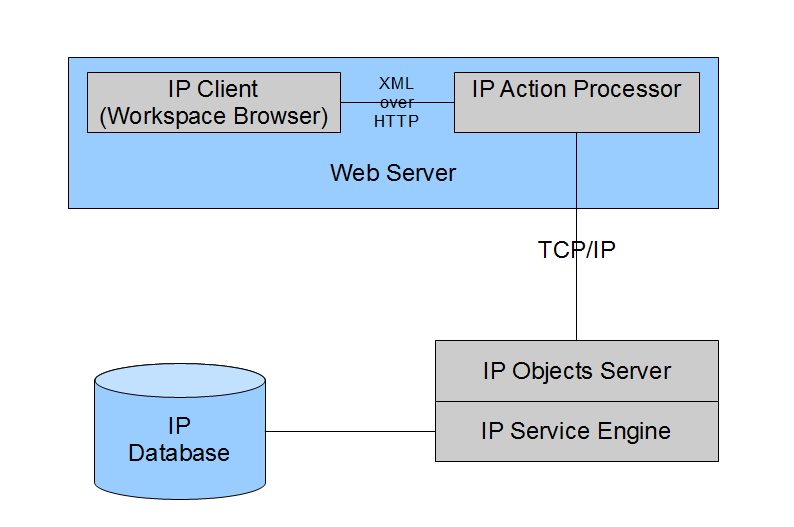
The iProcess Workspace Browser is a web-based front-end for iProcess. The Workspace Browser is nothing but a web-application which is available in both asp and servlet versions. It does not connect directly to the iProcess engine though. It sends all requests to the iProcess Action Processor which is also a web-application (again available in a servlet and asp version). The Action Processor forwards the request (via TCP/IP) to the iProcess Objects Server which works with the iProcess Engine and processes the request. This arrangement is shown below (with both the Workspace Browser and Action Processor deployed in the same web-server).

Now this setup is fine in an ideal scenario but in most organizations web-servers are isolated (‘fenced’) from the core infrastructure (such as databases and enterprise servers). Usually the access to the core infrastructure is through a single channel (e.g. through a messaging queue server) with direct TCP/IP connections and port 80 requests from outside blocked. In that case you will need to deploy the Action Processor inside the ‘fence’ with the core infrastructure and setup a proxy system to communicate with the Workspace Browser (which will be sitting outside the ‘fence’). The proxy system will transport the HTTP request over the allowed channel (JMS in this example) and return the response. An example is shown below using JMS.

 To implement the above we need to create the following components:

1) Local Proxy – which will be the target for the Workspace Browser instead of the Action Processor which is sitting inside the ‘fence’ and therefore not accessible over HTTP.

2) Proxy for JMS – Proxy which puts the http request in a JMS message and gets the response back to the Local Proxy which returns it to the Workspace Browser.

3) JMS Queues – Queues to act like channels through the ‘fence’.

4) Service for JMS – Service to handle the requests sent over JMS inside the ‘fence’ and to send the response back over JMS.

You might ask why do we need a local proxy and why not call the BW Proxy directly. The reason is very simple. The BW Proxy and Service should be as uncluttered as possible, ideally their only task is to carry the request through the ‘fence’ and bring out the response. Any processing of the request and response should be done somewhere else (and as we shall see in the example there is a lot of processing required).

As we don’t want to fiddle with the internals of the iProcess Workspace Browser, we simply add a Local Proxy which does the processing of the request and response. Then we set the Workspace Browser to send all Action Processor requests to the Local Proxy. This means that the Local Proxy will ‘behave’ exactly like the Action Processor as far as the Workspace Browser is concerned.

To put it in one line: using a Local Proxy allows us to separate the ‘behavior’ of the Action Processor from the task of sending the message through the ‘fence’.


In the example to follow, we have:

1) JSP based Local Proxy (easy to code – no compiling required!).

2) BusinessWorks based Proxy for JMS

3) TIBCO EMS Server based queues.

4) BusinessWorks based Service for JMS


In the next part, the example!


Deploying to a Business Work Service Container

There are three ‘locations’ or ‘containers’ that a Business Work EAR can be deployed to. These are:

1) Business Work Standalone Service Engine

2) Business Work Service Engine Implementation Type (BWSE-IT) within an ActiveMatrix Node

3) Business Work Service Container (BW-SC)

The first two scenarios do not require any special effort during deployment and usually can be done through the admin interfaces (bw-admin for standalone and amx-admin for BWSE-IT). But if one wishes to deploy an EAR to a Service Container then we need to setup the container and make a change in the Process Archive. This tutorial is for a Windows-based system.

Before we get into all that let us figure out what a BW Service Container (BW-SC) and why one would want to use it.

A BW-SC is a virtual machine which can host multiple processes and services within individual process engines. Each EAR deployed to a BW-SC gets its own process engine. The number of such process engines that can be hosted by a container depends on the running processes and the deployment configurations. To give an analogy, the load that an electric supply (service container) can take depends on not just the number of devices (i.e. process engines) on it but also how electricity each device requires (processes running within each engine).

Keeping in mind the above, when using BW-SC, it becomes even more important to have proper grouping of processes and services within an EAR.

The standard scenario when you would use a BW-SC is for fault-tolerance and load-balancing. In other words, to deploy the same service (fault-tolerance) and required backend processes (load balancing) on multiple containers.  Also Service Containers can be used to group related services together to create a fire-break for a failure-cascade.

The first step to deploying to a BW-SC is to enable the hosting of process engines in a container. The change has to be made in the bwengine.xml file found in the bw/<version>/bin directory. Locate the following entry (or add it if you cannot find it):

<property>
<name>BW Service Container</name>
<option>bw.container.service</option>
<default></default>
<description>Enables BW engine to be hosted within a container</description>
</property>

The second step  is to start a service container to which we can deploy our EARs. Go to the command line and drill down to the  bw/<version>/bin directory. There run the following command:

bwcontainer –deploy <Container Name>

Here the <Container Name> value, supplied by you, will uniquely identify the container when deploying EARs. Make sure  that the container name is recorded properly. In the image below you can see an example of starting a container called Tibco_C1.

Starting Container


The third step is to deploy our application to the container (Tibco_C1). Log in to the BusinessWork Administrator and upload the application EAR. In the image below the test application EAR has been uploaded and awaits deployment.

EAR Uploaded

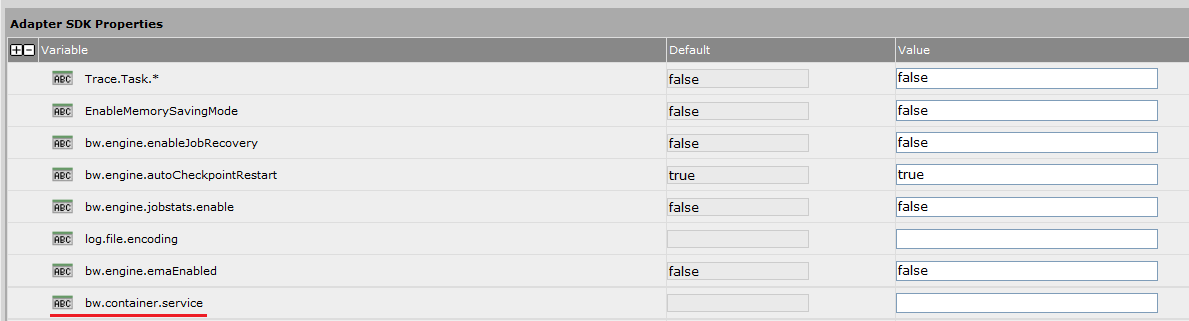
The fourth step is to point the process archive towards the container we want to deploy to. Click on the Process Archive.par and select the ‘Advanced’ tab. Go down the variable list and locate the bw.container.service variable which should be blank if you are already not deploying to a container.

Property Set

Type the container name EXACTLY as it was defined during startup. TIBCO will NOT validate the container name so if you set the wrong name you will NOT get a warning, you will just be left scratching your head as to why it didn’t work. In our example we enter ‘Tibco_C1’ in the box (see below).

  Property Defined

 Save the variable value and click on Deploy. Once the application has been deployed, start the service instance. That is it.

To verify that your application is running on the container, once the service instances enter the ‘Running’ state, go back to the command line and the bin directory containing bwcontainer.exe. There execute the following:

bwcontainer –list

This command will list the process engines running in any active containers on the local machine. The output from our example can be seen below.

Command Line Listing

We can see the process archive we just deployed, running in the Tibco_C1 container.

If you have any other containers they will also show up in the output.

Remember one important point: If a service container goes down, all the deployed applications also go down. These applications have to be re-started manually through the Administrator, after the container has been re-started.


Continuing with Java

The continue keyword in the Java programming language provides functionality to skip the current iteration of a loop. Unlike the break keyword which ‘break’ the execution flow out of the loop, continue allows us to skip an iteration. This functionality is often replicated using an if block as below:

for(int i=0;i<100;i++) {
     if(i%2==0){
          // Execute the loop only for even values of i otherwise skip the iteration
      }
}

The above piece of code can be re-written using the continue keyword:

for(int i=0;i<100;i++) {
     if(i%2!=0){ 
          continue; //Skip the loop if i is odd
      }

     //Loop continues as normal if i is even
}


While this simple example might not bring out the power of the humble continue keyword, imagine if there were several conditions under which the iteration should be suspended. That would mean having a complicated set of nested if-else blocks to check the flow of execution within the iteration. Whereas with continue we just need to check the condition for skipping the iteration. There is no need for the else part.

Another advantage of using continue  is that it allows the control to be transferred to a labelled statement, as we shall see in a bit.

Before going further let me state the two different ways continue can be used:

Form 1:   continue;

Form 2:   continue <label>;

Example:

The scenario: Imagine you need to extract keywords from a text source. This is a multi-step process with the first step being converting the text into tokens (i.e. breaking down the paragraphs and sentences to individual words based on some rules). Then the set of tokens is filtered and common usage words, such as ‘the’, are removed (stop word removal). Following this you may again want to filter the set using a domain specific set of common use words or you may want to ignore the text source all-together (i.e. not process it) if it has certain words in it. For example if you are interested only in processing articles about Apple products you would want to ignore articles which talk about the fruit.

As you might have guessed, the above process requires several iterations over different sets of data. This is where a continue statement would be most effective. The code given below shows how to use continue. Obviously there are several other ways of implementing the desired functionality (including not using continue).

// Stop and ignore word lists

static String stopWordList[] = { “at”, “in”, “the”, “and”, “if”, “of”,“am”, “who” };

static String ignoreWordList[] = { “king”, “queen” };

——————————

// Sample strings

String samples[] = {“I am the king of the world!”, “For I am the Red Queen”, “A man who wasn’t there” };

outer: for (String sample : samples) {

    System.out.println(“Original String: “ + sample + “\n”);

    // Create tokens

    String[] tokens = tokenize(sample);

    System.out.println(“Unfiltered Tokens:”);

    printToken(tokens);

    // Filter tokens on stop words

   ArrayList<String> filteredTokens = new ArrayList<String>();

    for (String token : tokens) {

        if (filterStopWord(token)) {

           continue; // —————- (1)

       }

        if (filterIgnoreWord(token)) {

        System.out.println(“Ignore – “ + sample + “\n\n”);

          continue outer; // ———- (2)

       }

       filteredTokens.add(token); // — (3)

    }

    // Print filtered tokens
   System.out.println(“Filtered Tokens:”);

   printToken(filteredTokens);

   System.out.println(“\n”);
}// End of outer: for

The full .java file can be found here (right click and save-as).

The logic flow is as follows:

1) Initialise a set of samples (can be any source – taken simple sentences for this example).

2) The for loop labelled ‘outer’ iterates through the set of samples.

3) Create unfiltered token set from the sample.

4) Print the token set (unfiltered).

5) Initialise array list to store the filtered set of tokens.

6) Iterate through the unfiltered token set to filter out tokens.

7) Within the iteration if the current token is a ‘stop word’ then skip the inner loop (using continue – line (1)) as it should not be added to filtered set.

8) If the current token is not a ‘stop word’ then the current iteration will continue as normal.

9) Next we check if the token is on the ‘ignore’ list, if it is then we stop processing the sample and skip the iteration of the outer for loop (using labelled continue – line (2)).

10) If the token is not on the ignore list then we continue with the current iteration and add the token to the filtered set.

If we run the above program with the required methods in place we will see the following output:

Original String: I am the king of the world!
Unfiltered Tokens:
[I]  [am]  [the]  [king]  [of]  [the]  [world!]
Ignore - I am the king of the world!

Original String: For I am the Red Queen
Unfiltered Tokens:
[For]  [I]  [am]  [the]  [Red]  [Queen]
Ignore - For I am the Red Queen

Original String: A man who wasn't there
Unfiltered Tokens:
[A]  [man]  [who]  [wasn't]  [there]
Filtered Tokens:
[A]  [man]  [wasn't]  [there]

As per the logic, the first two samples are ignored and the third one is processed.

Changing TIBCO Messaging Encoding from ISO8859-1 to UTF-8

If your project has messaging encoding set to UTF-8 but your TIBCO Administrator is set to ISO8859-1 then you will not be able to deploy your project.
The TIBCO recommended encoding to use is UTF-8. But in case you made the mistake of not using UTF-8 (either in your project or in TIBCO Administrator) then you will need to change the encoding.

To change project encoding:
– Click on the root project folder.
– In the configuration panel you will see three tabs [Configuration, Project Settings and Design Time Libraries].
– Click on Project Settings where you will find a drop down titled ‘TIBCO Messagin Encoding’ with two values: ISO8859-1 and UTF-8.
– Select UTF-8 and click Apply and then save your project.

To change it for the TIBCO Administrator:
– Locate the tibcoadmin_.tra file. It should be in: \administrator\domain\\bin
– Open this file in a text-editor and locate the entry ‘tibcoadmin.client.encoding’ and ‘repo.encoding’.
– Change them both to UTF-8 if they are not UTF-8.
– Save the file.
– Restart both the Hawk Agent and the TIBCO Administrator service on the machine.

If the Administrator fails to deploy a UTF-8 encoded project after making the changes above and in the log you see a ‘com.tibco.infra.repository.OperationFailedException: Can not change encoding from ISO8859-1 to UTF-8 because of other existing connection with different encoding’ exception try and restart your Hawk Agent and any other TIBCO related service.