Creating a WSDL resource retriever for Service Resource

After developing a web-service using the Service resource from the TIBCO Designer palette (ver. 5.6) we need to develop a resource retriever to allow clients to access the service WSDL.

The basic idea behind getting the WSDL for a Service resource web-service is to use the SOAP Retrieve Resources activity (found within the SOAP menu) and point it to the Service resource for the web-service with the filter set to “wsdl”.

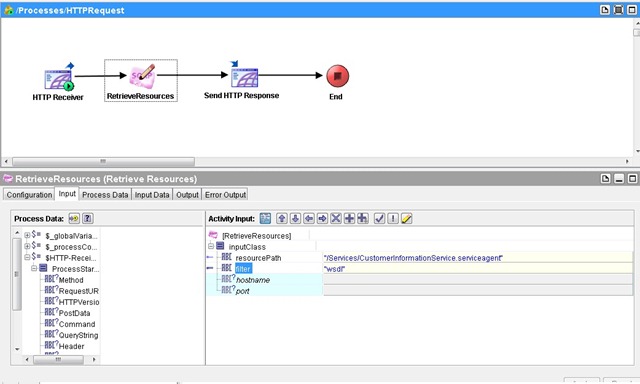
The screenshot below shows the basic process for retrieving the WSDL. We will use the HTTP Receiver process starter connected with the SOAP Retrieve Resources which sends its output to Send HTTP Response activity.

wsdlretriever

Here is how it works:

  1. A HTTP Receiver forwards the incoming request to a SOAP Retrieve Resources activity (SOAP-RRA).
  2. The SOAP-RRA retrieves the WSDL text and outputs it to the Send HTTP Response activity.
  3. The Send HTTP Response activity then sends the WSDL text as response to the HTTP request received by the HTTP Receiver.
  4. The process ends.

The HTTP Receiver will need an HTTP Connection to complete the configuration.

The key thing here is to configure the SOAP-RRA correctly. The HTTP Receiver even though connected to the SOAP-RRA provides no input to it.

Click on the SOAP-RRA and go to the Input tab in the properties (see the screenshot above). In the Activity Input section we need to configure the resourcePath and filter values.

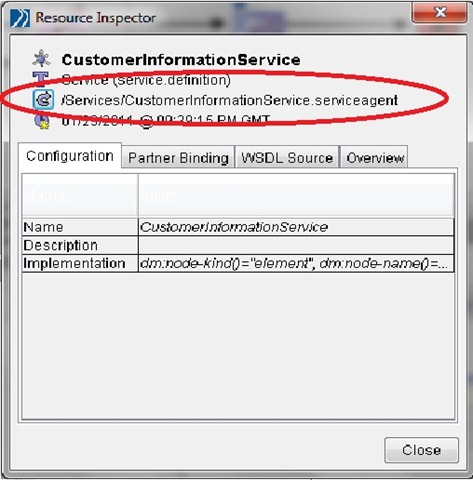
The reourcePath should point to the Service resource. To get the Service resource path right-click the Service resource for the web-service whose WSDL is required and click on inspect resource.

The Resource Inspector window that pops up will show the resource path for the Service resource (see marked area in screenshot below). Remember to enclose the path in double-quotes!

resourcelocation

In the filter value type in “wsdl” (double quotes included) as we want the WSDL to be retrieved.

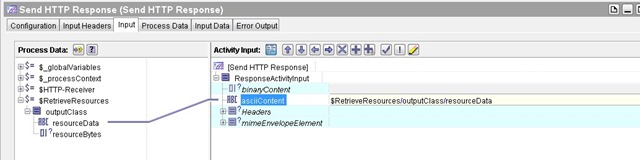
SOAP-RRA connects next to the Send HTTP Response activity. We connect the resourceData output from SOAP-RRA to the Send HTTP Response asciiContent input as shown in the screenshot below.

resourceresponse

The Send HTTP Response activity connects to the End Process activity which completes the process.

Testing the Retriever Process

To test the process start the process tester. Make sure you select the retriever process we have just created AS WELL AS the Service resource for the web-service whose WSDL is being retrieved.

Open up the browser and type in the address defined in the HTTP Connection used for the HTTP Receiver.

The WSDL should pop-up in the browser and if you check the process tester you will find the retriever process would have fired once.

Developing Web-Services with TIBCO ActiveMatrix BusinessWorks


In this post we are going to talk about developing web-services in TIBCO ActiveMatrix BusinessWorks (AMBW). We will be using the following software:

1) TIBCO Designer 5.6 to develop and test-deploy the web-service

2) SOAP-UI 3.0.1 (Freeware) to test the web-service

We are going to be looking at web-service development from a conceptual point of view rather than concentrating on specific implementations.

The TIBCO AMBW Process Design Guide and the Palette Reference do an excellent job of describing web-service implementations.

Before we get into web-service development in TIBCO AMBW let us just review what goes into developing a web-service. As there are many excellent books on web-services out there this section will be restricted to a brief overview.

A web-service consists of three basic components:

  1. Description – all the information about the web-service, including how to invoke it.
  2. Protocol – how to communicate with the web-service.
  3. Implementation – how to implement the operations defined by the web-service.

The Description of a web-service needs to address both, the abstract interface as well as its concrete implementation. As we all know this description is contained in the WSDL file associated with the web-service. With modern tools it is very easy to create client stubs for web-services using just the WSDL.

The WSDL also acts as a contract between the service provider and the consumer. Therefore a skeleton of the web-service implementation can also be created using just the WSDL. This approach towards service development is called the ‘contract-first’ approach where you define the interface before defining the implementation.

The opposite of the above process i.e. ‘implementation-first’ approach allows easy exposure of existing functionality as a web-service.

TIBCO AMBW allows for both styles of web-service development.

Before we go any further it will help to review the structure of a WSDL document.

There are two ways of implementing a web-service in TIBCO AMBW:

1) Service Resource

2) SOAP Event Source process starter

Which route you take depends on your specific requirements as well as the current state of development.

You would ideally use a SOAP Event Source process starter to expose a single process as a web-service over a single transport protocol. In case you need to expose multiple processes over multiple transport protocols and have a clean separation between web-service definition and implementation, use the Service Resource.

I will first focus on using the Service Resource as it (in my opinion) is a cleaner way of doing things and conforms well to the philosophy behind web-services of separation of interface and implementation.

SOAP Event Source will be covered in another post.

Now from the TIBCO AMBW Process Design Guide we have:

“A service joins an abstract WSDL interface to a concrete implementation and exposes them on one or more endpoints”

There are three main steps in setting up a web-service using the Service Resource:

1) Define the service interface using the WSDL and Schema Resource – involves definition of the abstract part of the WSDL as well as defining schema for input and output data using the Schema Resource

2) Setup the endpoint bindings to expose the service.

3) Implement the operations defined in the web-service.

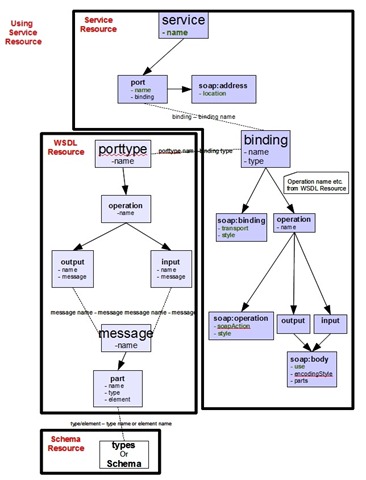
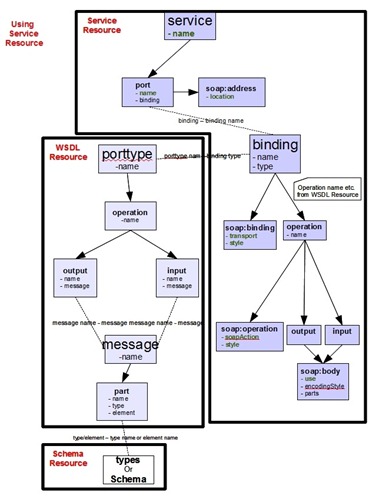
Figure 1 shows the mapping between TIBCO AMBW components and various components of a web-service (as represented in the WSDL).
WebServices_ServiceResource

Figure 1: Mapping between TIBCO AMBW components and various components of a web-service.

Request Context

As the Service Resource separates the service definition from the implementation, there might be a requirement to access the ‘context’ of the request by the implementing process. This ‘context’ could be the client’s digital signature (for authentication) or something simpler like a client ID. The Context Resource allows us to do just this. We can define a schema to store the relevant ‘context’ which can then be accessed by the implementing process using the GetContext and SetContext activities.

Example

I will take the example of a simple web-service for Customer Information Management (add and retrieve customer information). The web-service will contain two operations:

  1. Add Customer Information (name, age and ID).
  2. Retrieve Customer Information using Customer ID with a Request ID for logging purposes.

To get the customer information we supply the customer ID and a request ID to the web-service which will return the customer information.

To add information for a new customer we will supply the customer information (id, name and age).

Going back to the three step process for implementing a web-service using the Service Resource:

Step 1: Defining the web-service interface

We will use the Schema Resource and the WSDL Resource to define the web-service interface including the operations and the associated input/output schema.

The Schema

Firstly create the Schema for the input and output messages using the Schema Resource (within the XML menu).

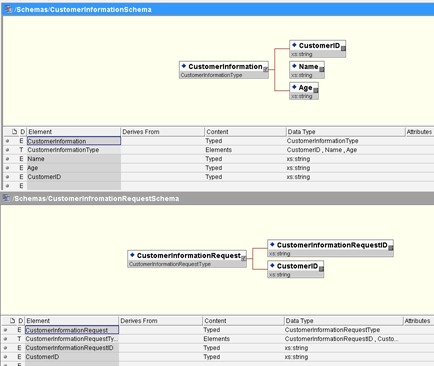
Below we can see a simple CustomerInformation schema which defines the customer information structure (for both retrieval and addition) as well as a CustomerInformationRequest schema which defines the structure of the incoming request for customer information.
schema

The Web-service Interface using WSDL

Next we define the interface for the web-service using the schema we defined above and a WSDL resource.

We will first define the input and output messages using the schema and then use them to define the operations. All the required resources are in the WSDL menu.

Create a new WSDL resource and double-click it. Add two new Messages: CustomerInformationRequest and CustomerInformation. The output message for the retrieve information operation has the same schema as the input for the add information operation.

Next we define the operations using previously defined Messages. Add a PortType resource to start defining operations. Double click the PortType resource and add two new Operations: AddCustomer and RequestCustomer.

In the AddCustomer operation configuration, add an input message with the message schema set to CustomerInformation (we are now connecting the schema with the interface). We don’t need any output message for this operation.

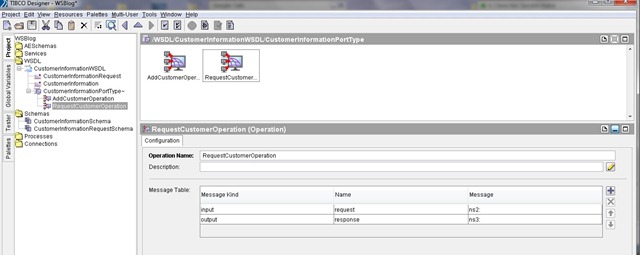
In the RequestCustomer operation configuration, add an input message with message schema set to CustomerInformationRequest and the output message with message schema set to CustomerInformation.

This can be seen in the screenshot below.

wsdl

You will notice that till now we have been defining only the interface of the web-service (namely the operations and messages). We have not spoken about things like which transport protocol to use or the style of the web-service (document vs. RPC).

The next step is to use the Service resource to configure the concrete endpoints using the interface we have just defined. After that in the final step we will use the Service resource to join the abstract interface of the service with the actual implementation of the operations.

Step 2: Implementing the service endpoints using Service Resource

Add a Service resource from the Service menu.

The first thing we need to do is to give this service a ‘face’ (in other words define which interface it is going to ‘implement’).

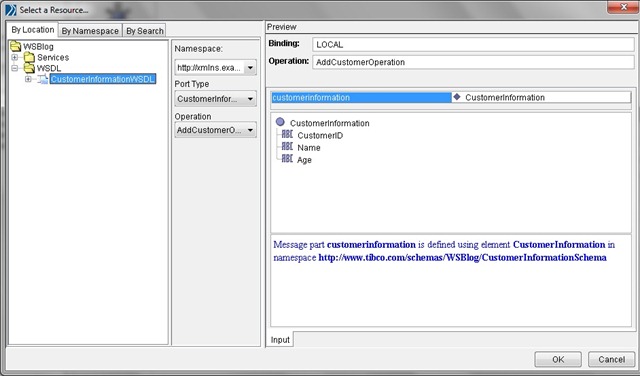
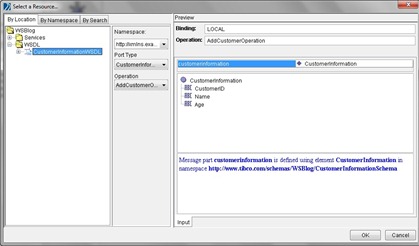
Double-click it and within the Configuration tab click on the ‘+’ button in the ‘Implementation’ section. In the window that pops up locate the WSDL file (on the left side) with the abstract interface that you have defined in Step 1. The PortType, Namespace and Operations will be loaded from the WSDL on the right hand side. This is shown in the screenshot below.
service1

Check the operations and the input and output for them. Click on ‘OK’.

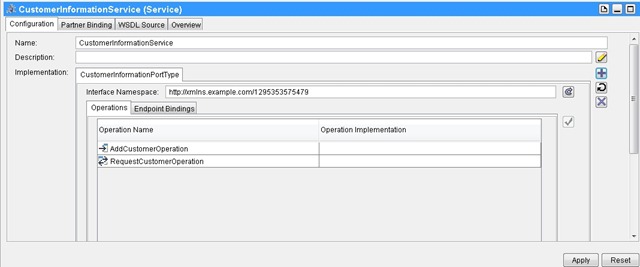
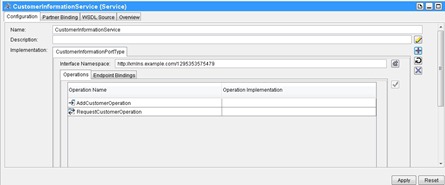
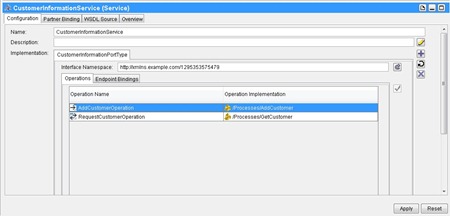
The Service resource should contain a whole lot of new stuff now (see screenshot below). In Configuration tab, the Implementation will have two tabs: Operations and Endpoint Bindings.
service2

The next thing to do is to create the endpoint for the service. This involves defining style and encoding of the service and the operations and selecting the transport for the service.

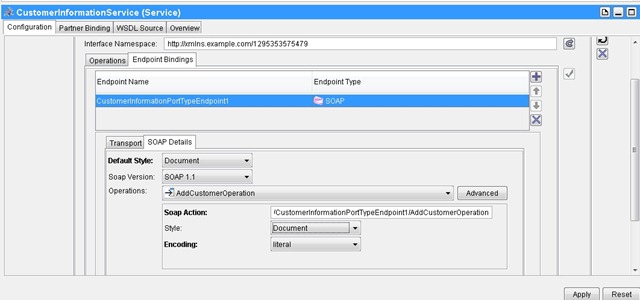
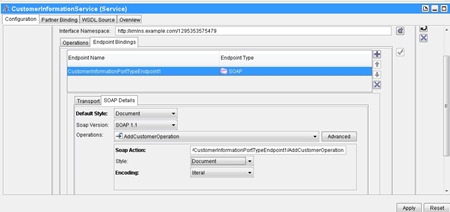
Click the ‘Endpoint Bindings’ tab and then the ‘+’ to add a new endpoint. Change the Endpoint Type to SOAP and two more tabs will come up: Transport and SOAP Details.

Transport tab requires you to select a HTTP connection (as we are going for SOAP over HTTP in this example), which is required to host the service. Once the transport connection is set up you will see the Endpoint URI appear below it.

Next move to the SOAP Details tab. Define the default service style (document or RPC – in present example document) and the styles and encoding for the different operations within the service (in our case document – literal). You can set style to ‘Use Default Style’ to make your life easier in case of multiple operations.

The screenshot below shows this.
service3

The final step is to go ahead and implement the operations we have defined in interface.

Step 3: Implementing the service operations

Firstly we create the processes for adding customer information and requesting customer information. The only thing I will say about creating the processes is that the Start and End activities must have their outputs and inputs same as the WSDL messages setup for the corresponding web-service operation.

For example the process to handle request for customer information (i.e. RequestCustomerOperation) should have output for the Start activity a WSDL message: CustomerInformationRequest (that is the input going in to the RequestCustomerOperation). Same goes for the input to the End activity which should be a WSDL message: CustomerInformation.

Go back up to the Operations tab and click on the ‘binocular’ button in the Operation Implementation column next to the operation to be implemented. All processes which have input and output WSDL messages matching the operation to be implemented will be shown in the window that pops up. Select the relevant processes. Do the same for all the operations defined in the interface.

The screenshot below shows the two operations for the example being implemented.
service4

Test

Everything is now set for the web-service to be tested. But before we test the service it is worthwhile to see the WSDL for the service that we have just created. Go to the WSDL Source tab in the Service resource. This is the WSDL for the service. You will need this file to create a test client.

There are two ways to give a client access to the WSDL. First is to setup a WSDL retrieval process using SOAP Retrieve Resources resource with a HTTP Receiver process starter. Then the client will be able to download the WSDL as normal. The second option is to save the WSDL file (by clicking on Save WSDL in WSDL Source) and providing a local copy to the client.

We shall use SOAP UI  (free edition) to test the TIBCO web-service. We setup a new SOAP UI project with a local copy of the WSDL file. SOAP UI creates test requests for the web-service as a part of the project setup.

Make sure in the TIBCO Designer the Service resource and the processes implementing the operations have been selected and run.

In SOAP-UI, go to the test request for the operation to be tested and double-click it. A blank request will open up with ‘?’ where you need to fill in data to complete the request.

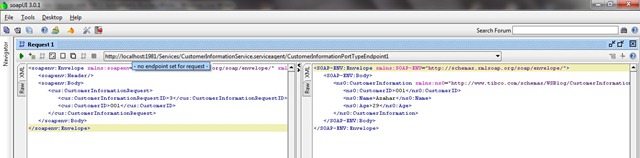
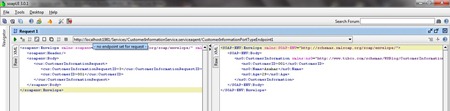
After filling in the data, execute the request by pressing the green ‘play’ button. On the right-hand side you will see the response of the request (if the operation has a response). In case of an error you will see an error response.

The screenshot below shows a test of the RequestCustomerOperation. The customer information request sent is on the left-hand side and the response from the example web-service received on the right-hand side.
test


Hope this limited example has explained how to setup a basic web-service in TIBCO AMBW using the Service resource. There are several things that I have left out including using the SOAP Event Source process starter, using Contexts and retrieval of WSDL. All these topics deserve complete posts in themselves that is why I aim to cover them as and when I get the time!

Note: If you are going to deploy to BW engine then you will need to create an archive file (.ear). Remember to include the Service Resource (if you are using it) in the Process Archive starter processes before building the archive.

Please leave comments and suggestions.

Update:

Have added a new post on WSDL retrieval for Service resource-based web-service.
Structure of a Web-Services Description Language (WSDL) Document


Structure of a WSDL document:

Service

– Port definition

   – soap:address

Binding

– soap:binding

– operation

   – soap:operation

      – input

          – soap:body

      – output

          – soap:body

PortType

– operation

   – input

   – output

Message

– part

Types

WebServices

Figure 1: WSDL Structure – visual representation of various sections of a WSDL and the relationships between them.

Any WSDL document is a combination of an abstract service interface and its concrete implementation.

The PortType section represents the service in an abstract way, similar to an ‘interface’ in object-oriented programming (OOP). In other words, it lays down the ‘contract’ between the service provider and the consumer by listing the various operations supported by the web-service as well as the required input and the resulting output of each operation. The inputs and outputs are listed as messages which are described in the Message section of the WSDL.

The Binding section is similar to an interface implementation in OOP. The ‘type’ attribute in the Binding tag points to the PortType  name which is being implemented.

The thing to keep in mind is that the Binding section is where the abstract web-service contract is implemented or realised. Thus, among other things the Binding section describes operational level details such as which protocol to use for transporting SOAP packets (usually HTTP) and how the web-service will be called (style and encoding).

The Service section describes one or more concrete ‘endpoints’ where the functionality of the service can be found.

Figure 1 shows these various sections of the WSDL and how they connect with each other.

Finally the Types section contains schema information for the various inputs and outputs from the web-service operations.

Installing TIBCO iProcess Engine SQLServer (11.1.0) on Windows Server 2003

Pre-requisites:

1) Administrator rights on the target server

2) iProcess Engine (version 11.1.0)

3) pthread.dll – POSIX thread implementation for Win32 environment. 

4) SQLServer instance with user account having the correct permissions (see below) – as we will install the SQLServer version of the iProcess Engine.

NOTE: The installation process may require several re-starts, especially if you also install SQLServer instance on the same server, so make sure that the server can be restarted without problems.

VERY IMPORTANT NOTE: During the install process you will be required to supply a lot of information including usernames, passwords, node names, port numbers etc. Make sure you note these down as you complete each screen of the install wizard. It is very easy to forget a password or username when you really need it!

Space requirements:

iProcess Engine ~ 370 – 400 MB

Installation process:

The installation process is quite straight forward with a wizard like interface.

Pre-install:

1) Copy pthread.dll to the windows/system32 folder. This is required and the installation process will not start till the pthread.dll file is in the right place. On Windows 7 the folder to use for pthread.dll is windows/SysWOW64.

2) SQLServer access – make sure you can connect to the SQLServer instance and make a careful note of the connection parameters, username and password to be used. Also make sure the username you use has permission to create new databases/tables.

The installer will ask you for this information as the iProcess engine stores all its information in a database. The installer creates the main iProcess database and various tables, within it, as a part of the installation process. The easiest way of messing up the install is to give it a username which doesn’t have the required permissions to perform the table creation activity.

3) Log in as administrator.

Install:

The install section is fairly straight forward and is well covered in the TIBCO iProcess documentation. I will, therefore, not do a step by step description here but give an overall picture of the install process.

The install process starts off with various iProcess Engine related settings such as the node name (default: staffw_nod1).

NOTE: If you change the iProcess node name MAKE SURE you record it as you will be needing it almost everywhere.

Things done during the install process:

1) Define node name.

2) Define licensee name, which for some strange reason has to be at least 4 characters long.  

3) Define a new iProcess administrator account (username and password).

4) Option to require users to login using a password (it is a hard to miss checkbox at the bottom of the screen).

5) Setup a SQLServer connection and create two new SQLServer user accounts (usernames and passwords): swpro and swuser 

6) Setup Business Studio deployment (WebDAV), JMS connectivity, Email server as well as the iProcess web-server.

Post-install:

iProcess Objects Server Configuration –

This is where the fun really begins. Now is the time to configure the iProcess Objects Server. This bit is specially important if you are planning to install the TIBCO BusinessWorks iProcess plugin. Basically the plugin needs DB connection information. So you might want to select ‘ENABLED’ here.

A very important thing that you will need to do during this step is to setup the port for TCP. Open up the ‘services’ file in windows/system32/drivers/etc and scroll all the way to the bottom. There you should see two entries for iProcess similar to:

NODENAME_worker    PORTNUMBER/tcp      # Entry inserted by installer
NODENAME_watcher  PORTNUMBER/tcp      # Entry inserted by installer
Below the last entry add your own entry to define the TCP port to be used by the iProcess Objects Server (replace CAPPED entried with your values):

PORTNAME       PORTNUMBER/tcp               #Your comments

Copy-paste the PORTNAME to the TCP port textbox in TCP Settings tab in the iProcess Objects Server Configuration. 

Save all settings and close the Configuration panel. Then restart the server.

After restart go to the ‘Services’ section of the Administrative Tools panel and locate the iProcess service (there will be two services if you also installed the iProcess web server).

NOTE: Make sure the SQLServer on which the iProcess database was created is up and running.

Start up the ‘iProcess Process Sentinals’ service. 

 If everything has been installed properly then the service will start up normally (it takes some time to do so, don’t be worried if you don’t see the progress bar moving for some time).

In case the service does not start up normally (Windows will throw up an error message) the FIRST thing to check is whether the SQLServer instance, you created the database on, is reachable and you can login with the same credentials you provided (swpro) during the install.

Testing the install:

The best way to test the install (ONLY if you are the administrator AND you have studied the documentation) is to play around with ‘swadm’  in the ‘swserver/NODENAME/util’ directory.

One of the things you might want to do is allow addition of non-OS users to iProcess, especially important if you have enabled external authentication (e.g. through LDAP). 

Open up command line interface and go to the ‘util’ directory. Type in and press enter the following command:

swadm set_attribute 0 ALL 0 DISABLE_USER_CHECK 1

The above command sets up a new attribute called DISABLE_USER_CHECK with the value of ‘1’. It will allow the addition of non-OS users for all processes. 0 is the Logical Machine ID, ALL signifies do it for all processes (otherwise add process name) and 0 is for the process instance.

An easier way to check it is to install the Windows-based Workspace Browser (11.1.0) and point it to the new iProcess engine.

NOTE: I have done a similar install on Windows 7 – 64bit edition. While TIBCO does not support iProcess Engine SQLServer (11.1.0) on Windows 7, there were no problems in the installation and the performance was up to the mark.

Please Gamble [Live] Responsibly

In UK there is a habit of trying to plan and manage everything. While this habit is one of the main reasons for the advanced state of development enjoyed by the countrys’ residents, sometimes it can be pushed to insane limits.

For example, out here  all gambling websites, shops and even advertisements need to have information pointing to ‘GambleAware’ along with the advice: “Please gamble responsibly”. The main purpose for this is to remind people to ‘gamble responsibly’ and to show people with gambling related problems a way out.

All that is well and good but my question is how can one gamble ‘responsibly’?

Gambling itself is an act of taking a risk. So they are asking us to ‘take a risk’ with responsibilty? If you were responsible for something would you take a risk? The obvious answer to that is ‘depends’ on what you were responsible for and what was the associated risk, but that brings us to the question of what exactly is involved in gambling. What is it that we are risking?

So I went to the GambleAware website to try and figure out what they highlight as ‘risks’ of gambling without responsibility… in other words what is their definition of ‘gambling responsibly’. This is what I found (from their website http://www.gambleaware.co.uk/responsible-gambling):


A person who gambles responsibly:

  1. gambles for fun, not to make money or to escape problems.
  2. knows that they are very unlikely to win in the long run.
  3. does not try to ‘chase’ or win back losses.
  4. gambles with money set aside for entertainment and never uses money intended for rent, bills and food.
  5. does not borrow money to gamble.
  6. does not let gambling affect their relationships with family and friends.
Weird!
1) Gambles for fun … : Well I don’t know about making money but as far as escaping problems is concerned then they should put the ‘Please escape from reality responsibly’ advice up on each and every source of entertainment. From movies to sports! Isn’t that what we use these things for? To escape from reality which is usually full of problems?
 
2) … very unlikely to win … : They should put ‘Please create babies responsibly’ advice in each and every hospital’s maternity ward. To warn the newborns that life is a game that is impossible to win. Everyone dies in the end!
3) … win back losses. : I thought it was a good thing to overcome odds and to ‘win back’ what one lost. Some of the greatest people did this to ‘achieve’ greatness. I also thought this was part of human nature to try and overcome loss. This is what allows us to go on in face of great odds and rebuild our life. This calls for the following general advice: ‘Please loose responsibly’.

4) … money set aside for entertainment … : This calls for the following advice in all shops: ‘Please spend money responsibly’ because we know that whenever we go into a shop or supermarket or a mall, hundreds of offers/sales/deals are thrust into our face! That is why expensive brands (which we really can do without) are reduced marginally in price so that the average person, thinking of it as a deal, tends to buy them leading to overspending.

5) … does not borrow money to gamble. : This is a good one. All the banks out there distributing credit cards like they were going out of fashion listen up! Put the following advice in bold letters on your credit card: ‘Please borrow money responsibly’. So that people don’t run up huge credit card bills buying things they don’t need and cannot afford just because they are able to ‘borrow’ money easily.

6) … affect their relationships …  : Another good one. All offices should have the following advice in all public areas: ‘Please work responsibly’. Also all managers and senior managers should be sent on special ‘working responsibly’ courses! We know work is one thing that affects our relationships the most. It keeps us away from our loved ones even after work hours. Gives us stress which we often take out on people we love.

Maybe we just need one advice tattood on the arm of all newborns: ‘PLEASE LIVE RESPONSIBLY’.

😉

So what do you think guys? Do you think we will see these bits of good advice popping up anywhere soon?

UK General Elections: What I saw…

This was my first time voting in any kind of national election. Therefore I was quite excited to go and vote. Throughout the day I was feeling like an excited puppy who has been tied to a post.

Since the day of voting was NOT a holiday I had to finish off my work before I could go and vote. I had to control my excitement till the evening. The voting hours were 7am to 10pm. With 15 hours to cast your vote I was quite surprised to hear, later that night, that many voters had to be turned back as they waited in the line outside because they were not able to get a ballot paper before the polls closed. I guess the issues on which these elections were fought really motivated the people to come out and make a difference.

The polling station near our house was in a local school. When I reached the location around 7pm and found the area to be deserted. There were small posters pointing the way to the polling station. That was the only thing there to indicate that the polling station was somewhere near by. As I stood outside the school, trying to figure out where exactly the polling station was located I saw few people walking out of the school through a side entrance. That is how I located the polling station.

Once inside I handed in my voters card (which had been sent by post) and they handed me a blank ballot paper. I went into the booth and cast my vote by marking my chosen candidates name with a pencil.

I was surprised to see such a basic, no-fuss no-mess voting system. No electronic voting machines, no tamper proof ballot paper, no sign of police and absolutely no crowds. The whole process took about 5 mins.

The results are obviously now out. I did stay up till the Conservative party had achieved a healthy lead on Labour. My prediction of Nick Clegg joining hands with Gordon Brown was partially right. It was a hung parliament and Nick Clegg did tie up with one of the two big political parties, just that it was not Labour.

In India the elections are a whole lot more spicier and logistically speaking very difficult to organize. Seeing the process at work in UK for a relatively small population I had even more respect for the Indian election system, however more complicated it may be for the average voter.

UK Elections: The First Debate

In my view the pre-election debate is an excellent idea.  Today in the first debate it put the politicians in the middle of the arena to face the UK public for the first time.

Since it was a live debate with audience questions and a very strict presenter the politicians were not able to get away by arguing and making unrealistic claims like a bunch of 10 year old kids.

Now the three personalities standing in the firing line Nick Clegg from Liberal Democrats, David Cameron from the Conservatives and Gordon Brown from Labour are quite impressive.

Gordon Brown, starting with the disadvantage of having faced some of the toughest times ever seen, brings a certain mature, almost elderly, calm and solidity. After having faced the pressure he appears as a person who has seen and done it all. Not a very good feeling to give out if you are running for four more years as the leader of the country. The new leader needs to have some fire in him, I believe.

David Cameron was the Poet Parrot in th debate. Whenever he was asked a question he started by confirming the issues raised in the question were important and valid (duh! David that is why they asked the question!) and then mixed in words which would befit a poet writing a song to raise the moral of troops on the frontline… something like ‘we shall over come’. There were certain moments in the debate when both Gordon Brown and Nick Clegg were ganging up against him and he looked positively peeved.

Nick Clegg was the winner of the debate for me. He did appear to tackle the questions head on with some common sense and logic. He smashed his earlier image of being a ‘radical’ and emerged as a person with some real ideas and thoughts on how to run the country out of troubled times. He made sure that the public sees Lib Dem as a real option and not just a fringe party which is in there just to kick down the established order.

For their closing statement Gordon Brown played the roles of a grandfather talking about things to come. David Cameron recited a few rousing lines as to why Conservatives and Nick Clegg spread some fairydust around trying  hard to make people believe that Lib Dem are a real option.

The other day I heard on Radio Four someone saying that if Nick Clegg won the elections he would be the most surprised man in UK. After today’s debat he seems to have come one step closer to ensuring that Lib Dems are seen a real alternative. I hope he doesn”t forget that sometimes trying too hard can leave you with a red face. 😉

My prediction after the first debate: Nick Clegg and Gordon Brown ganging up to form the next government.

Invictus

Invictus by  William Ernest Henley

Out of the night that covers me,
Black as the pit from pole to pole,
I thank whatever gods may be
For my unconquerable soul.

In the fell clutch of circumstance
I have not winced nor cried aloud.
Under the bludgeonings of chance
My head is bloody, but unbowed.

Beyond this place of wrath and tears
Looms but the Horror of the shade,
And yet the menace of the years
Finds and shall find me unafraid.

It matters not how strait the gate,
How charged with punishments the scroll,
I am the master of my fate:
I am the captain of my soul.

UK Elections: A Ringside View

UK Government elections are coming up in a few weeks time (May first week).  This election is a face-off between the Labour Party, who have been in power for the last 12 years, and the Conservative Party, who are sensing a real chance to form the government this time. There is a third party – the Liberal Democrats, dream of becoming king-makers and in reality can seriously affect the base of the two established parties.

One issue which, according to those who claim to be the ‘experts’, is going to dominate the voter’s minds is the economic crisis that gripped UK last year.

I believe that in politics your point of view is decided not by logic or analysis but by the political party that you belong to. Keeping this in mind, the fact that the UK economy has just about limped clear of the recession can be seen from three different prespectives.  

The Labour view is that they have taken some ‘very difficult’ decisions through some of the ‘toughest times’ seen by ‘world’ economy and have guided the UK economy out of the battlefield. According to the Labour government the economic crisis was not of their creation but something external in which the UK economy got dragged into.

The Conservatives have the view that Labour was responsible for the country facing such difficult times. That if they had been in power they could have helped UK sustain the storm better.

The Lib-Dems do not have a clear view of things. They keep changing their views depending on what the two major parties are saying.

There is one thing though, that all three of them agree on:  they have to take some ‘very difficult’ decisions and  some of the ‘toughest times’ are still ahead for the country.  

All three are saying there have to be big cuts in Government spending to reduce the deficit. But what exactly should be cut and how the resulting gaps will be filled, changes with the party. Great fear is also being generated regarding cuts in frontline services (e.g. Police and NHS).

What no one is willing to admit is the fact that the road ahead is not full of options. The steps that can be taken are limited. Yet the voters are being fooled into believing that there are multiple roads out of the mess and that each party holds the map to a different route.

Looking at these things from a temporary resident’s point of view I can say if frontline services like NHS and Police are cut then it will surely make the country less attractive for skilled workers. Free healthcare and a safety are two major requirements especially when it comes to people with families.

Immigration is the second point where these parties will clash. Again there are not that many options out. Already immigrations laws are very strict. Apart from closing the Tier 2 (Work Permit) and Tier 1 (Migrant Worker) schemes to South Asians (which will damage the UK economy and push work out of the country) they really can’t do anything.

To clamp down on illegal immigration will require increased government spending (for better border security and tougher enforcement) but the question remains: where will the money come from? Also the government will never admit this but illegal immigrants contribute a lot to the UK economy. They do the kinds of job which the locals will not do. Illegal immigrants, in fact, help the UK economy by providing cheap labour. They don’t pay any tax but even if they were legal the amount they earn would keep them well below the tax bracket.

In my view this election is going to be about whichever party screams the loudest and is able to convince the UK voter that yes indeed they can pull rabbits out of hats and pennies out of thin air!

Preparing TIBCO iProcess to connect with Business Works in Windows 7

TIBCO iProcess and Business Works are very easy to work with ONCE you have everything set up. The big catch is ONCE. Especially when you are trying to set it up in an environment which is not supported (i.e. Windows 7 and MS SQL Express 2008).

ENVIRONMENT SETUP

OS: Windows 7

Database: MS SQL Express 2008.

Tibco: Active Matrix Business Works 5.7, iProcess Engine 11.1.0, Business Works iProcess Plugin 11.0.1

Connecting iProcess with Business Works requires the TIBCO Technology Plug-in (specifically the Business Works iProcess Plugin).

Once you install the plug-in you will see iProcess components on your Business Studio palette.

CREATING A CONNECTION

To work with iProcess you need to create an iProcess connection. It has a very helpful option to ‘test’ the iProcess connectivity. I would recommend creating a connection and using the connectivity test feature before you start any EAI project involving iProcess and BW.

If you get ‘icudt36’ or any other ‘UnsatisfiedLinkError’ you might be missing the location of the iProcess plug-in related files from your Windows PATH environment variable. All the required libraries for iProcess can be found in the business works plug-in directory within the bin sub-directory (e.g. tibco\bw\plugins\bin). 

The second issue you might face, if you have selected ‘auto config’ in the Database Connection tab,  is regarding ‘database connection information’ not being sent to the client. If you have tried setting DB connection information to ‘enabled’ in the User tab in the iProcess Object Server configuration utility ‘SWEntObjSvCfg’ and still no luck then you need to get into the Windows Registry and edit the settings there. The settings can be found in ‘Staff EntObj Server’ key. Locate your node and then set ‘DBConnectionAccess’ string data to ‘1’ if it is set to ‘0’.

STARTING AN iPROCESS CASE and CASE MANAGEMENT

Once you are able to connect to an iProcess engine the next thing is to start/stop cases and in general do some ‘case management’.

You might face problems related to ‘Distributed Management Objects’ (e.g. error BW-iProcess-001001) then you need to get ‘Microsoft SQL Server 2005 Backward Compatibility Components’ which contains the DMO component and ensure that the ‘swpr’o (or whichever database user you set up for iProcess) has sysadmin role in the database.

You may need to change the SQL configuration to enable OLE Automation using ‘sp_configure’ and change execution permissions for certain stored procedures if you get errors related to ‘not being able to execute stored procedure…’.