In my previous post I took the England and Wales property sale data and built a Google Cloud dashboard project using Terraform. In this post I am going to use the same dataset to try MongoDB’s new time-series capabilities.
This time I decided to use my personal server instead of on a cloud platform (e.g. using MongoDB Atlas).
Step 1: Install the latest version of MongoDB Community Server
It can be downloaded from here, I am using version 6.0.3. Installation is pretty straightforward and installers available for most platforms. Installation is well documented here.
Step 2: Create a database and time-series type of collection
Time-series collections in MongoDB are structured slightly differently as compared to the collections that store documents. This difference comes from the fact that time-series data is usually bucketed by some interval. But that difference is abstracted away by a writeable non-materialized view. In other words a shadow of the real data optimized for time-based queries [1].
The creation method for time-series collections is slightly different so be careful! In case you want to convert an existing collection to time-series variant then you will have to dump the data out and create a time-series collection into which you import the dumped data. Not trivial if you are dealing with large amounts of data!
There are multiple ways of interacting with MongoDB:
- Mongo CLI client
- Your favourite programming language
- MongoDB Compass GUI client
Let us see how to create a time-series collection using the CLI and Python:
CLI:
db.createCollection(
"<time-series-collection-name>",
{
    timeseries :
    {
          timeField:"<timestamp field>",
          metaField: "<metadata group>",
          granularity:"<one of seconds, minutes or hours>"
    }
})
Python:
db.create_collection(
    "<time-series-collection-name>",
    timeseries = {
        "timeField": "<timestamp field>",
        "metaField": "<metadata group>",
        "granularity": "<one of seconds, minutes or hours>"
     })
The value given to the timeField is the key in the data that will be used as the basis for time-series functions (e.g. Moving Average). This is a required key-value pair.
The value given to the metaField is the key that represents a single or group of metadata items. Metadata items are keys you want to create secondary indexes on because they show up in the ‘where’ clause. This is an optional key-value pair.
The value for granularity is set to the closest possible arrival interval scale for the data and it helps in optimizing the storage of data. This is an optional key-value pair.
Any other top level fields in the document (alongside the required timeField and optional metaField) should be related to the measurements that we want to operate over. Generally these will be the values that we use an aggregate function (e.g. sum, average, count) over a time window based on the timeField.
Step 3: Load some Time-series Data
Now that everything is set – we load some time series data into our newly created collection.
We can use mongoimport CLI utility, write a program or use MongoDB Compass (UI). Given this example is with the approx 5gb csv property sale data I suggest using either mongoimport CLI utility or MongoDB Compass. If you want to get into the depths of high performance data loading then the ‘write a program’ option is quite interesting. You will be limited by the MongoDB driver support in the language of choice.
Adding the command I used:
mongoimport –uri=mongodb://<mongodb IP>:27017/<database name>
–collection=<collection_name> –file=<JSON file path> –jsonArray
The mongoimport CLI utility takes approximately 20 minutes to upload the full 5gb file when running locally. But we need to either convert the file from csv into json (fairly easy one time task to write the converter) or to use a field file as the original csv file does not have a header line.
Note: You will need to convert to JSON if you want to load into a time-series collection as CSV is a flat format and time-series collection requires a ‘metaField’ key which in this case points to a nested document.
Compass took about 1 hour to upload the same file remotely (over the LAN).
Compass is also quite good to test the data load. If you open up the collection in it you will see the ‘Time-Series’ badge next to the collection name (‘price_paid’ in the image below).
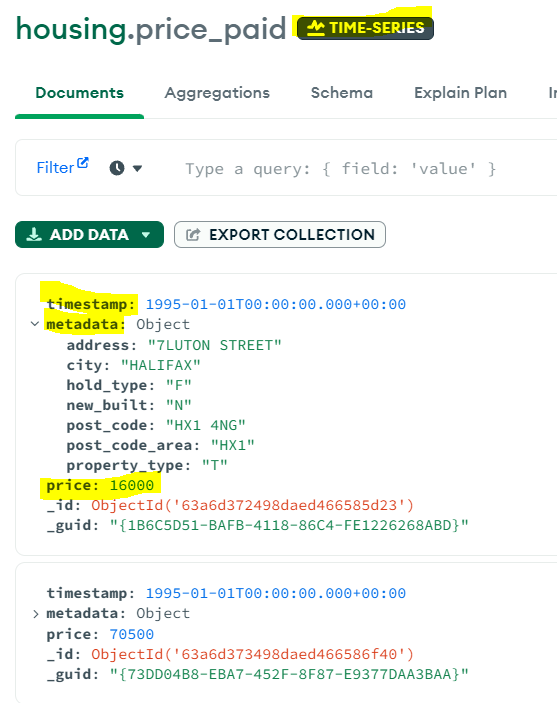
Let us see example of a single document (image above) to understand how we have used the timeField, metaField and top level fields.
timeField: “timestamp” – the date of the transaction
metaField: “metadata” – address, city, hold-type, new-built, post_code and area, property type – all the terms we may want to query by
top level: “price” – to find average, max, min etc. of the price range.
Step 4: Run a Query
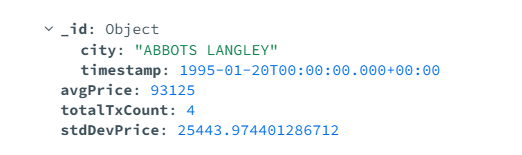
Now comes the fun bit. I give an example below of a simple group-by aggregation that uses the date of transaction and the city that the property is in as the grouping clause. We get the average price of transactions, the total number of transactions and standard deviation of the price in that group:
{
  _id: {
    city: "$metadata.city",
    timestamp: "$timestamp",
  },
  avgPrice: {
    $avg: "$price",
  },
  totalTxCount: {
    $sum: 1,
  },
  stdDevPrice: {
    $stdDevSamp: "$price",
  },
}
Sample output of the above (with 4,742,598 items returned):
Step 5: Run a Time-series Query
We are close to finishing our time-series quest! We have data grouped by city and transaction date now we are going to calculate the Moving Average.
{
    partitionBy: "$_id.city",
    sortBy: {
         "_id.timestamp": 1,
    },
    output: {
         "window.rollingPrice": {
             $avg: "$avgPrice",
             window: {
                  range: [-6, 0],
                  unit: "month",
             },
          },
    },
}
The above aggregation query uses the ‘setWindowFields‘ stage – partitioning by ‘city’ and sorting by the time field (‘timestamp’). We use a window of 6 months before the current timestamp value to calculate the 6 month moving average price. This can be persisted to a new collection using the ‘out‘ stage.
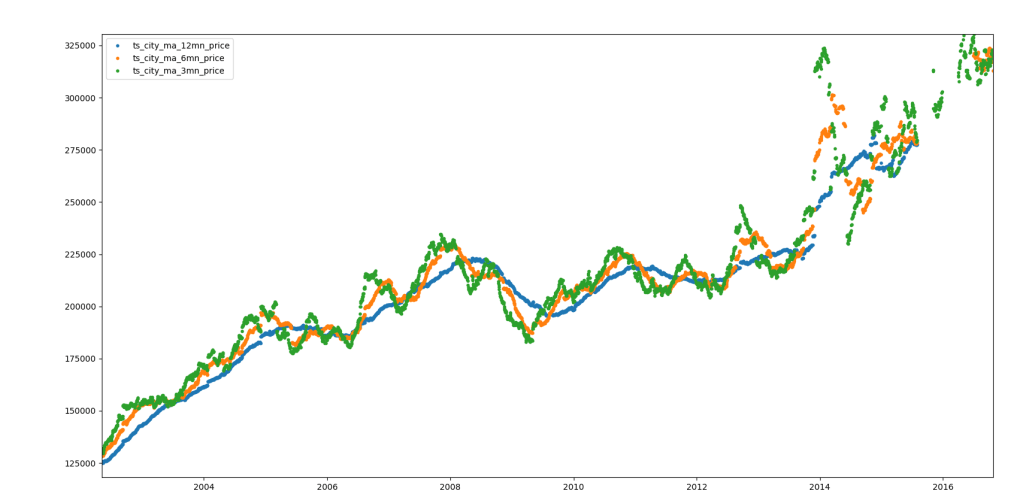
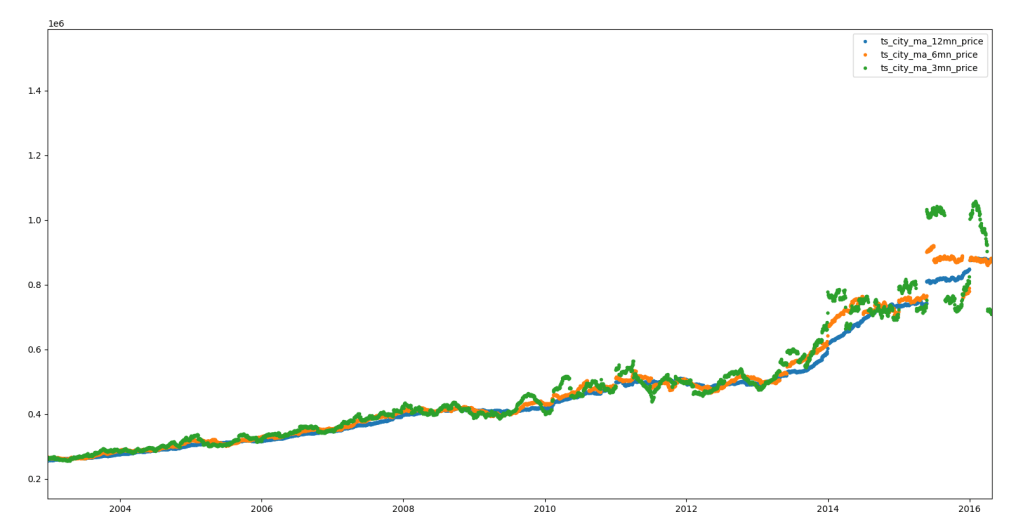
The image above shows the 3 (green), 6 (orange) and 12 (blue) month moving average price for the city of Bristol. The image below shows the same for London. These were generated using matplotlib via a simple python program to query the relevant persisted moving average collections.
Reflecting on the Output
I am using an Intel NUC (dedicated to MongoDB) with an i5 processor and 24GB of DDR4 RAM. In-spite of the fact that MongoDB attempts to corner 50% of total RAM and the large amount of data we have, I found that 24GB RAM is more than enough. I got decent performance for the first level grouping queries that were looking at the full data-set. No query took more than 2-3 minutes.
When I tried the same query on my laptop (i7, 16GB RAM) the execution times were far longer (almost double).
Thank you for reading this post!

1 Comment